Have you ever wanted to create a design that was larger than your Cameo could cut? That’s where the Tiling feature in Silhouette Studio Business Edition comes in handy!! Create your design as large as you like and then use the tiling feature to “cut” your design into a series of designs that can be cut and then joined to recreate your design. Sound confusing?? It’s not! Let’s walk through the steps and you will see how truly easy this feature is to use!
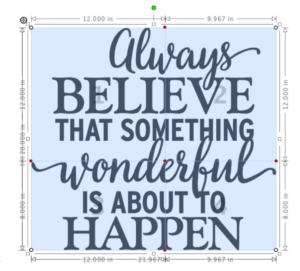
Begin by creating your design. I selected this design (#81664) from the Silhouette Design store. It was originally about 11″ x 10″ but I wanted it large enough to fit on a wallhanging. (I also changed the line color to black so it would be less distracting than the red lines.)
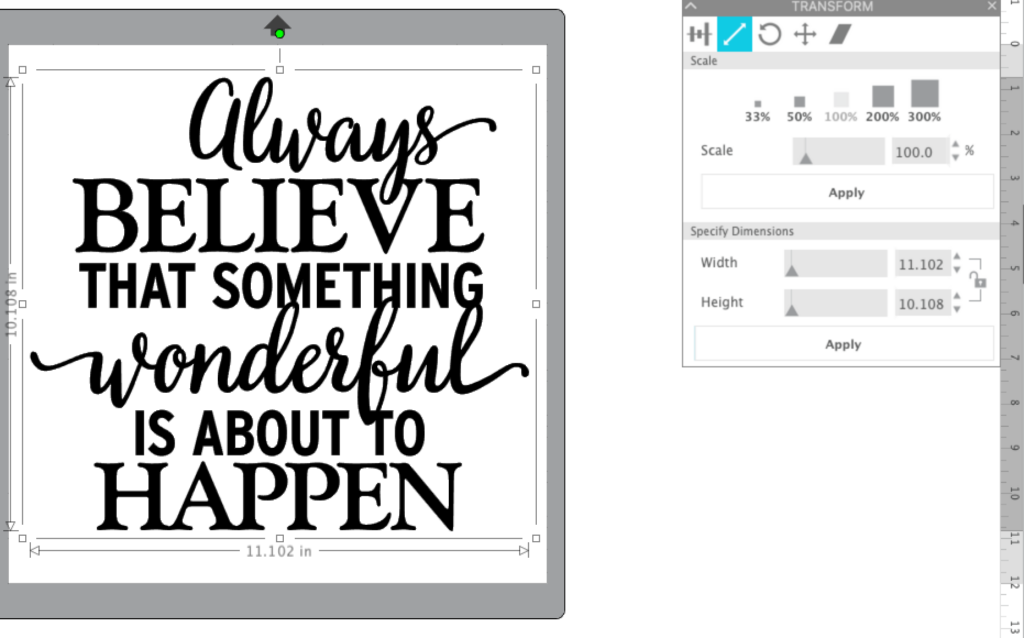
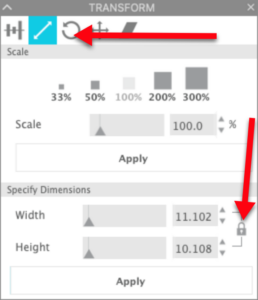
Notice in the Scale tab in the Transform panel that I clicked the padlock next to the size of the design to lock the aspect ration — this means that if I change one of the dimensions the other one automatically changes. (So much easier than doing all that math but don’t tell my hubby the math teacher I said that!)
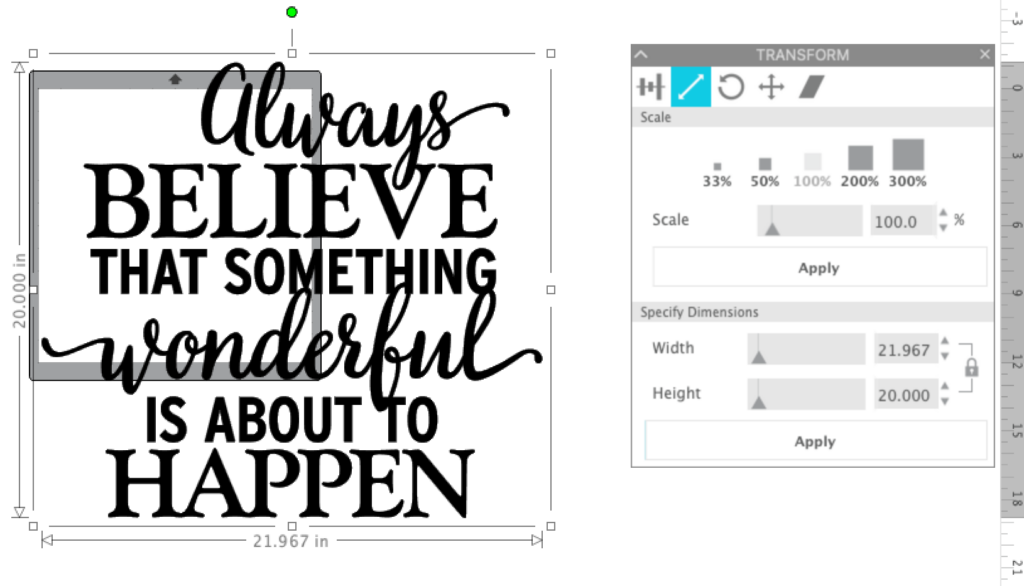
With the aspect ration locked, I changed the height to 20″ because I knew I wanted the finished project to be about 24″ tall. You can change one dimension and press the tab key and see how it changes the other dimension before you actually press Apply. You can do this multiple times until you get the exact size you want. When you have the dimensions you want, press Apply and the design size will be changed.
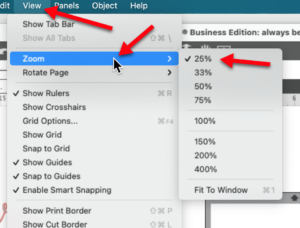
In order to see your entire design, you may need to zoom out … you can use the Zoom Out icon in the Quick Access Toolbar (QAT) at the top of the screen, you you can select a specific zoom percentage by selecting from the Zoom flout menu in the View menu. I selected 25% to be able to see my entire design.
Select the Media Layout Setup panel from the toolbar on the right side of the screen. If you do not see the icon for this panel in your toolbar, look for a small arrow and click on it … you will see a fly-out menu with additional choices.
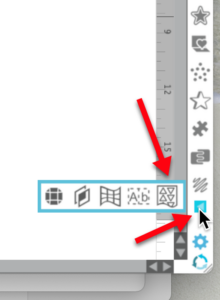
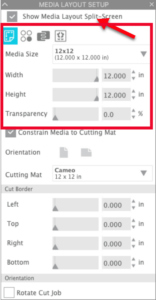
Click in the checkbox next to Show Media Layout Split Screen. Checking this box will activate the rest of the tools and options in this panel. The next thing you need to do is set your media size, if different than the 12″x12″ default value.
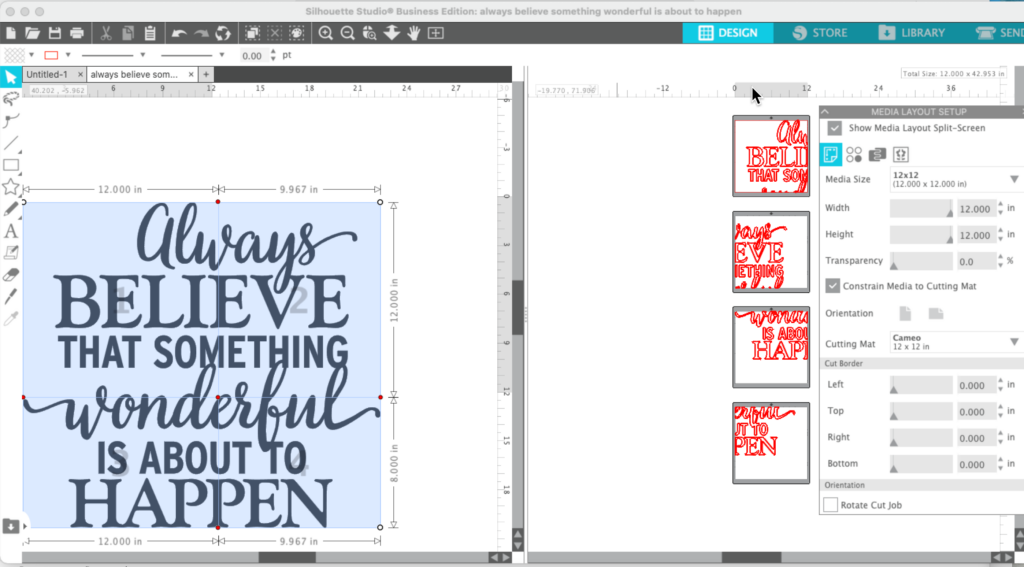
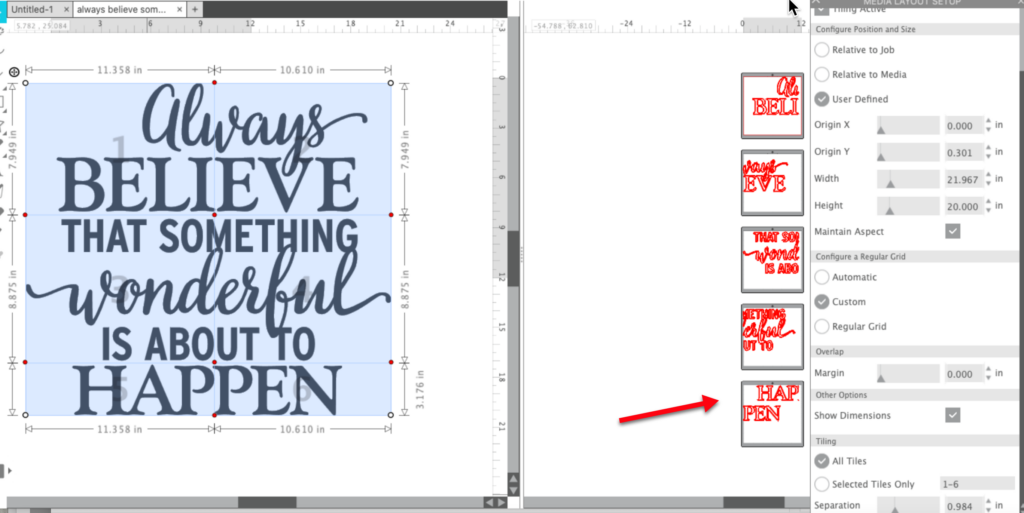
You should now see your design in the left part of the window with dotted lines showing the separations and the individual separations on the right side. If you don’t see both sides like this, click on the Tiling tab and click on Tiling Active to activate this feature.
Here’s the Tiling panel … we’ll take a look at each part individually.
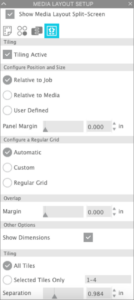
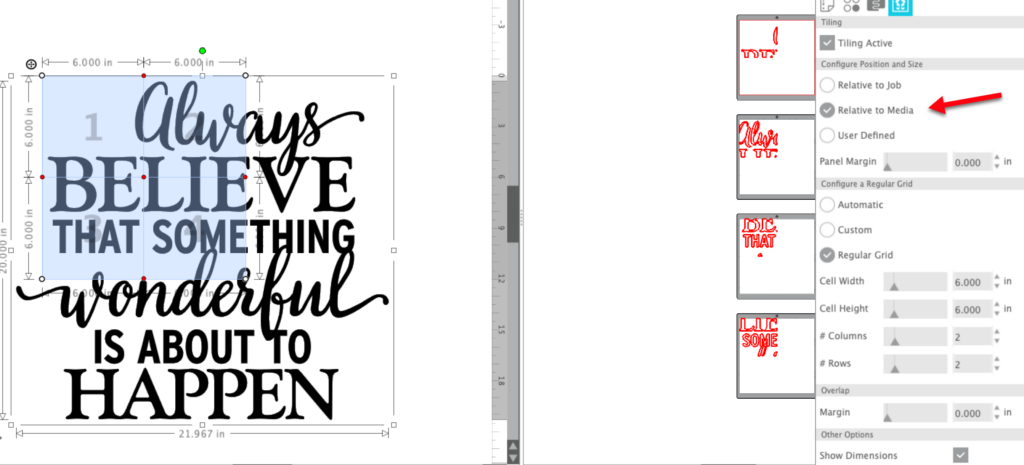
In the Configure Position and size menu, select Relative to job. The image on the left side of the screen will look like this. You can see the size of each of the tiles and where the divisions for each cut will fall. You will also see numbers behind your image to show which part of the design is in each cut area.
If you select Relative to media, it uses the media mat chosen. This option only includes the part of the design inside the selected media mat.
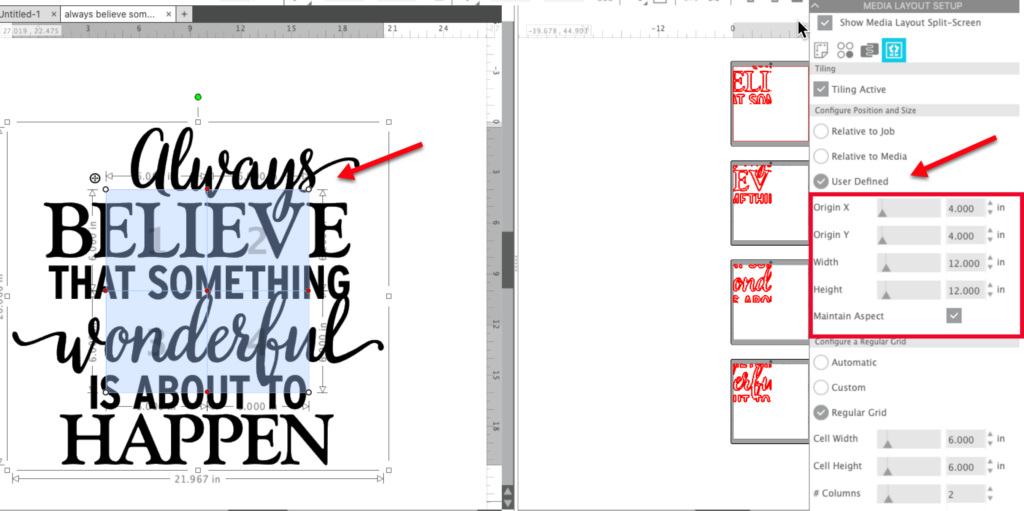
Selecting User Defined allows you to control the exact placement on the mat. You control the X-Y origin of the cutting area (here I changed both X and Y to 4″ to show you the difference). You can also change the width and height of the media. Maintain Aspect Ratio keeps these two content, unchecking it allows you to further customize the size.
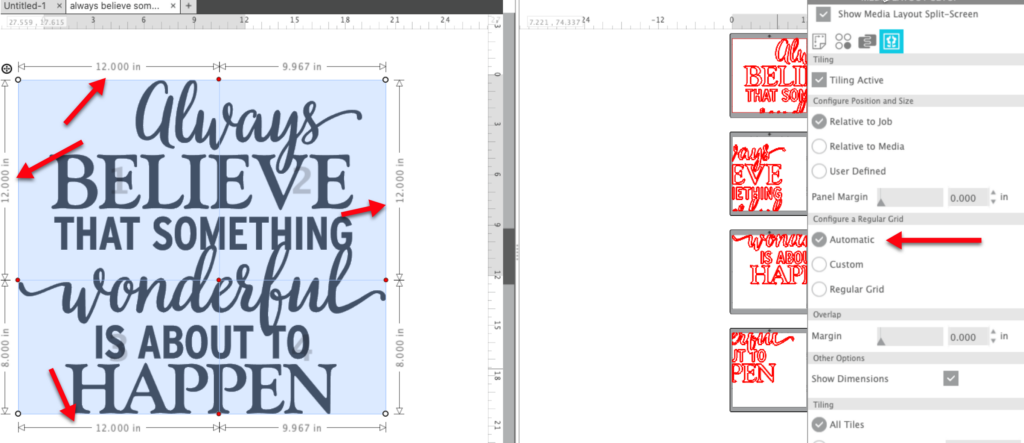
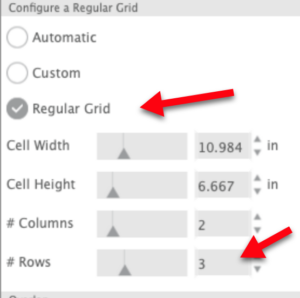
The Configure a Regular Grid area allows you to set the size of the grid being used to create the tiles. Selecting Automatic sets the grid to math the size of the media, where applicable. In this design, notice that whenever possible, the size of the tile is 12″.
Selecting the Regular grid option allows you to change the number of columns and rows in the grid. I set the grid rows to 3.
This now allows me to move the grid lines using the Custom option — I can now control where the tiling will occur to minimize partial cuts in the lettering.
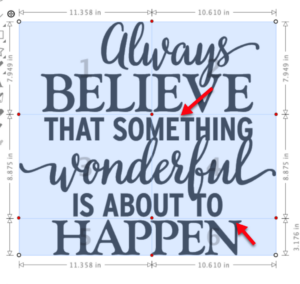
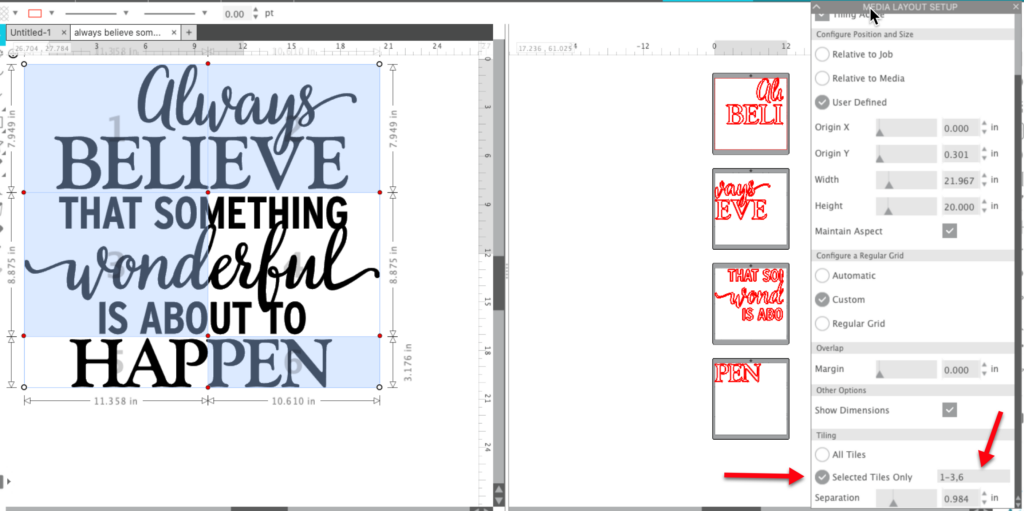
These changes created 5 different tiles for the 6 different sections. Notice in the last tile includes both parts of the word ‘happen’ since they would fit in the media size I selected.
Another control in this panel is Overlap Margin — this sets an overlap for help when aligning the tiles but depending on the material you are using and the size of the overlap you select, it might cause a noticeable layer where your tiles join so be careful when using this option. You can also turn the tile dimensions on and off by checking or unchecked the Show Dimensions box.
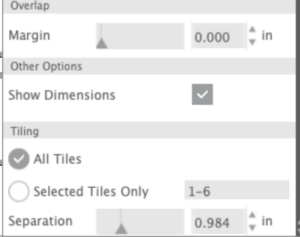
In the Tiling part of the panel, you can decide which tiles will be cut. Selecting All Types will place all the tiles in the Media Layout window for cutting. Specifying tiles in the Selected Tiles Only box places only those tiles in the Media Layout window. Click on individual tiles to deselect them, or enter the tiles you want to cut in the Selected Tiles Only box. Changing the Separation value adjusts the distance between the tiles.
The secret to using the Tiling tool successfully is being willing to “play” with the settings to see how you can make adjust your tiles to make the best use of your supplies. And perhaps even more important, it allows you to adjust the tiles themselves to minimize those areas where a design element is sliced by the cut … this makes it easier to line everything up when you are putting your final project back together.
Using the Tiling tool will make those big jobs quick and easy! I cannot wait to see what you create using the Tiling tool!!
If you enjoyed these tips, please join my Facebook groups … Libby’s Silhouette Group — Tips, Tricks, Tutorials and Projects, Libby’s Craft and Sewing Group and Running With Sisers – Juliet and Romeo. You can also find me on FB at Libby’s Loft.com. Please join and feel free to ask questions and share your creations! I look forward to seeing you there!!
Until Next Time,
Happy Crafting!!
Disclaimer: Posts on this site may contain affiliate links. Clicking on one of these links or making purchases at linked sites does not mean you pay more for your purchases. It means I may receive a small commission on your purchase. This commission helps defray the costs of this site and enables me to continue to provide you with new and exciting content.
Until next time,
Happy Crafting!
Disclaimer: Posts on this site may contain affiliate links. Clicking on one of these links or making purchases at linked sites does not mean you pay more for your purchases. It means I may receive a small commission on your purchase. This commission helps defray the costs of this site and enables me to continue to provide you with new and exciting content.