Silhouette Studio is a very powerful graphics program and some of its most powerful (and confusing) tools are found in the Modify Panel. I think this panel should be called the “magic panel” … and you will too!
You can find the Modify Panel in the right toolbar.
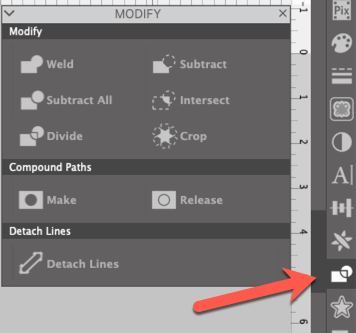
This panel is filled with powerful tools. Let’s take a look at them one at a time.
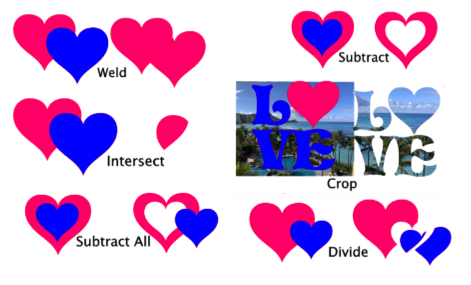
Weld
One of the most popular tools is Weld. Using the Weld tool, you can take individual objects that overlap and “weld” them together to become one object.
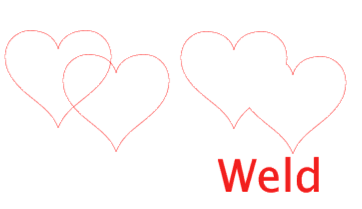
One of the most popular uses for the Weld tool is for text. When you have a script font, the letters overlap and would create cuts inside the letter.

Weld is such a popular tool that you can access it by right clicking on the object and selecting Weld from the menu. After welding, the letters become one fluid object.

When you weld text, it stops being editable text and is now an object. That means you cannot edit it. For this reason, if I need to weld text, I always make a copy and put it to the side of the workspace, “just in case”. That way, I always know what font I used and can edit the text if necessary.
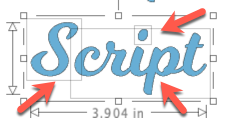
Any piece of the text that is not attached (like the “S” and the dot over the i above) will be a separate object. You will need to group all the parts together if you want to manipulate them.
Subtract
Subtract uses the front object to cut a hole in back object. Order of objects VERY important.

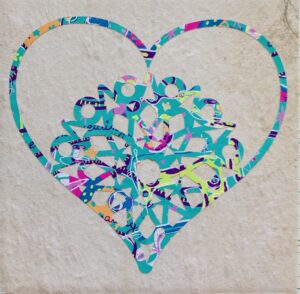
The example above shows that anyplace the top layer overlaps the bottom layer is subtracted from the bottom layer. Here’s another use great use for subtract.

Learn how to create this cute mandala filled heart by clicking here.
Subtract All
This tool works similarly to subtract but only removes the part of the bottom shape that is obscured by the top. Both Shapes remain.

How does this differ from Subtract, you ask? Let’s look at another design. We’ll start with these three flowers overlapping each other. I could cut them individually but when I get ready to place them, there might be ridges where they overlap …

If I select all three flowers and use Subtract, here’s what I get…

If I use Subtract All instead, here’s what I get ….

Now I can cut these three shapes and when I layer them, there will not be any unsightly ridges in the vinyl or fabric where they overlap.
Intersect
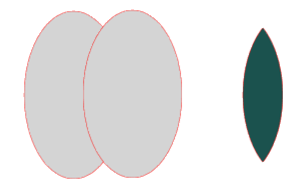
The Intersect tool only keeps the area where two or more objects intersect or lie across each other. Here I started with two ovals. I selected them both and clicked on Intersect. Here’s the result … I use this all the time to create leaves!
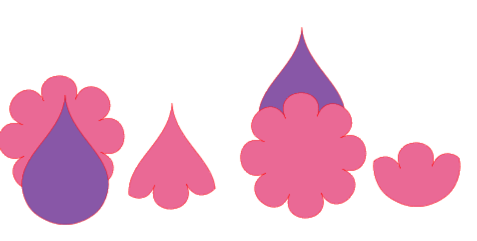
But wait, there’s more! This time lets’ start with a teardrop and a flower blossom.

I got two entirely different shapes, depending on where I placed the objects.
Divide
Divide works on design elements that overlap … it cuts the top design into the bottom layer and creates individual shapes where there was overlap and where there was not …. and all the parts remain …

Crop
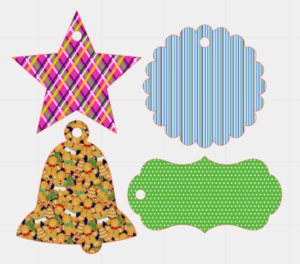
Crop is similar to intersect — it keeps the area where the shapes overlap. It is generally used for 3 or more objects. One of the more popular uses for Crop is to add photos to letters or objects.

To create this effect, add the photo or pattern you want to use. Then add the lettering or shapes you want to fill. The order of the objects is VERY important …. the object you are going to fill needs to be on top of the image with which you will fill it. For tips when adding photos to letters, click here.

You can also use Crop to add patterns to shapes or letters. To see how to add patterns to your Silhouette Studio software, click here.
There are a couple more tools in the Modify panel …. including tools for working with Compound Paths. Compound paths are very powerful but they deserve a lesson all their own! Be watching for a post about Compound Paths coming soon!!
I hope this has helped take some of the mystery out of the tools in the Modify panel. The best way to really understand how these tools work is to draw some shapes and try each tool.
If you enjoyed these tips, please join my Facebook groups … Libby’s Silhouette Group — Tips, Tricks, Tutorials and Projects, Libby’s Craft and Sewing Group and Running With Sisers – Juliet and Romeo. You can also find me on FB at Libby’s Loft.com. Please join and feel free to ask questions and share your creations! I look forward to seeing you there!!
Until Next Time,
Happy Crafting!!
Disclaimer: Posts on this site may contain affiliate links. Clicking on one of these links or making purchases at linked sites does not mean you pay more for your purchases. It means I may receive a small commission on your purchase. This commission helps defray the costs of this site and enables me to continue to provide you with new and exciting content.
This is so simple and to the point. Thank You.
Thanks!!!