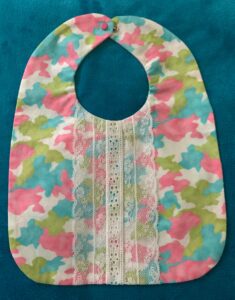
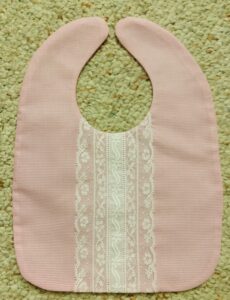
Who doesn’t love a little lace! Here’s a quick way to dress up a bib for that special girl in your life! Let’s get started.
Cut your fabric and laces
Use your favorite bib pattern or download my pattern and printable handout here. Cut a front and back from your fabric and place them to the side for now.
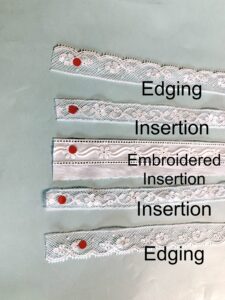
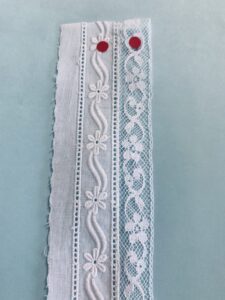
To create the fancy band shown here, you will need two pieces of insertion lace cut to 12″ each, two pieces of edging lace cut to 12″ each and one piece of embroidered insertion cut to 12″. Determine which side of the lace is the right side and mark it with a small red office supply dot to help you keep track. Often it is difficult to tell the difference between the right and wrong sides of lace so pick the side you like best and it becomes the right side.
Machine Setup
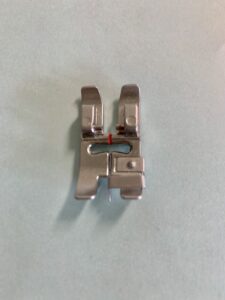
Set up your machine with 60wt thread in the needle and the bobbin and a size 70/10 needle. Select a zigzag stitch with a stitch length of 1.5 and a stitch width of 2.5. I like to use an Edge Joining or Stitch in the Ditch foot because it has a flange down the middle that I can use when attaching the laces to each other.
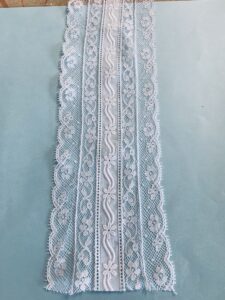
Create the Fancy Band
Trim the batiste edging away from one side of the embroidered insertion.
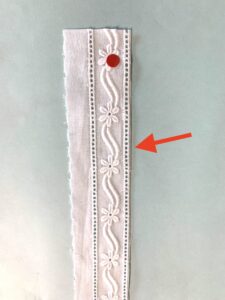
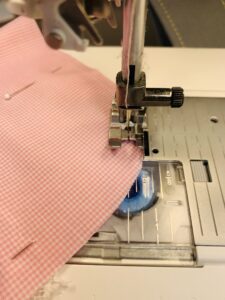
Place the trimmed side of the embroidered insertion on one side of the flange on the foot. Place the insertion lace on the other side of the flange. Stitch the two pieces together. Notice that I start with the lace completely under my foot to keep it from going down into the hole in the needle plate.

Stitch slowly, making sure you lace stays up against the flange. Be careful not to pull on the lace — you don’t want to stretch or distort it! Ripply lace is no fun! I like to use my needle down function to make it easier if I need to stop and adjust the position of my lace.
Position the remaining edge of the insertion lace on one side of the center flange on the foot. Place the straight side of the edging lace on the other. Stitch them together using the same zigzag stitch. Remember to gently guide the lace — don’t pull or stretch it!
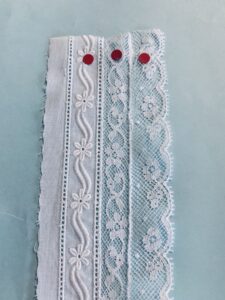
Repeat these steps for the other side of your band — trim the batiste away from the embroidered insertion and attach your insertion lace. Then attach your lace edging. Press your band when you are finished — remember to press and not iron so you don’t distort your lace. Trim your finished band to 12″.
Put it All Together
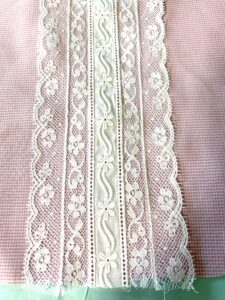
Place your fancy band on your front bib fabric, aligning the bottom of the band with the bottom of the bib. Make sure you have the band centered on the bib.

Pin in place. Straight stitch next to the outer edge of both pieces of the embroidered insertion. Straight stitch over the zigzag stitches between the insertion and edging laces.
Place the back of the bib on top of the finished front, right sides together. Stitch the front to the back, using a 1/4” seam. I change to my 1/4″ piecing foot with a flange to help me guide the fabric. I also use my needle down feature so I can adjust the curves of the bib, keeping them against the flange. Go slow and keep adjusting as necessary to get a smooth seam. Leave a 3” opening in one side from turning.
Trim the excess lace away from the neck area. Clip the curves, being careful not to clip your straight stitches. Turn the bib right side out, using a point turner to smooth the seams. Press. If you wish, use a piece of Stem a Seam to close the opening. Or hand stitch the opening closed.
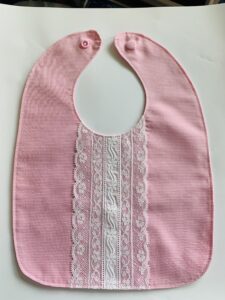
You can leave the bib like this or you can add topstitching around the bib to finish the edges. Topstitch around the bib, using a straight stitch, approximately 1/8” from edge. If you prefer, use a decorative stitch and adjust your position from the edge accordingly. Lay the pattern back over the finished bib and mark the position for the snaps. Place the snaps, using a snap setting tool.
And that’s it! Enjoy your beautiful heirloom-style bib!!
If you enjoyed these tips, please join my Facebook groups … Libby’s Silhouette Group — Tips, Tricks, Tutorials and Projects, Libby’s Craft and Sewing Group and Running With Sisers – Juliet and Romeo. You can also find me on FB at Libby’s Loft.com. Please join and feel free to ask questions and share your creations! I look forward to seeing you there!!
Until Next Time,
Happy Crafting!!
Disclaimer: Posts on this site may contain affiliate links. Clicking on one of these links or making purchases at linked sites does not mean you pay more for your purchases. It means I may receive a small commission on your purchase. This commission helps defray the costs of this site and enables me to continue to provide you with new and exciting content.
Until next time,
Happy Crafting!!