As many of you know, I love the beach!!! I created this cute frame d saying for a beach themed room. Several people asked how I did it, so here you go!!
The design (131213) was purchased from the Sihouette store at www.silhouetteamerica.com.
Create the Frame
Get started by opening a new workspace in my Silhouette software. I knew I was going to put this in a 5×7 frame so created a rectangle that was 4.5”x6.5”. Then I created a second rectangle, this time sized 3.75”x5.75”. I added color to my two rectangles to make them easier to see in the illustrations. You do not have to add color to yours.
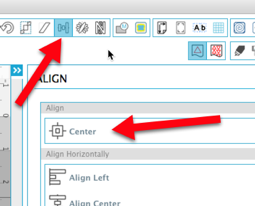 I selected both rectangles and clicked on the Align tool icon. I selected Center from the Align box and the two rectangles were centered horizontally and with each other.
To complete creating the frame, make sure that both the rectangles are selected. Right click and select Make Compound Path from the menu. This will combine the t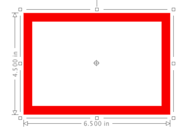 wo rectangles into one object that can be filled with color. Notice it looks like the top rectangle was punched through the bottom rectangle, creating a “hole” in the bottom rectangle.
Add the Purchased Phrase
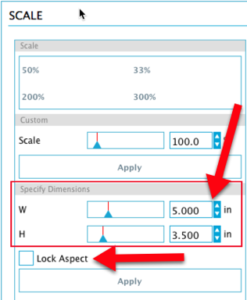
Once the frame was completed, I located my design in my Library and brought it into the workspaceby double clicking on the image in the library. When the design is placed in the workspace, it fills the mat!! You can change the size using the Scale window. In the Scale window, uncheck Lock Aspect Ratio. This will allow you to specify the exact height and width you wish to use. If you do not do this, the software will maintain the aspect ratio of the original design and change both dimensions when one is changed. You can also change the size by left clicking and dragging a corner handle to scale a design. I changed the size of my phrase to 3.5” x 5” approximately.
UnGroup the Phras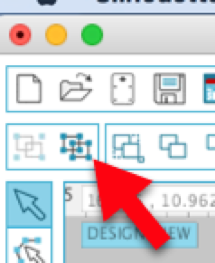 e
e
To change the colors, you will need to ungroup the phrase. I usually right click and select Ungroup from the menu. You can also click on the Ungroup icon in your toolbar. I am using Business Edition of Silhouette Studio so my icon is in the top left corner of my workspace. Once the phrase is ungrouped,  you can see an individual box around each element. However, when you first Ungroup the phrase, all
the elements are still selected. Click anywhere outside the phrase to deselect the elements.
Change Colors of the Elements
The words “beach” and “go” are already the same color. Left click on the word “The”. Hold the shift key and left click on each of the words or word groups except “beach” and “go”. With the words selected, click on the Fill icon and change these items to one color. I selected green. I also Grouped these elements by right clicking and selecting Group from the menu.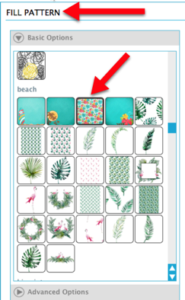
Left click on the word “beach” to select it. Shift left click on the word “go” so they are both selected. Right click and select Group. To get an idea of how the design will look with a patterned vinyl, click on the Fill Pattern icon and select a pattern fill that is close to the vinyl you will be using. I have a lot of patterns I have purchased from the Silhouette store and other sources and have grouped them into categories to make them easier to locate.
To complete the visual of the final design, click on the frame. If you are ![]() using Designer Edition or above, you can click on the Transfer Properties eyedropper. Then click on the word “beach” and the Pattern fill will be applied to the frame.
using Designer Edition or above, you can click on the Transfer Properties eyedropper. Then click on the word “beach” and the Pattern fill will be applied to the frame.
If you are using Studio, click on the frame and then click on the Fill Pattern icon and select the pattern you used for the words “beach” and “go”.
Regroup and Center the Design Elements
Select all the word groups. Right click and Group these together. Select all the elements and use the Center command in the Align window to make sure the words are centered in the frame.
Add Alignment Boxes
To make lining up the two different colors of vinyl, I added alignment boxes. These boxes will be cut from the green vinyl and also from the patterned vinyl and used to help position the vinyl. Create a small rectangle above the frame. Fill the rectangle with a color not already used in the design. With the rectangle selected, right click and select Copy. Right click and Paste. Right click and paste again. You should now have three small rec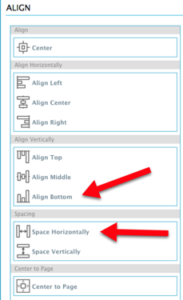 tangles. Move the first rectangle so it is close to the left edge of the frame top. Move the last rectangle so it is close to the right edge of the frame top.
Now select all three of these small rectangles. Click on the Align icon and select Bottom to align the bottoms of the three rectangles. Click Space Horizontally.
The three rectangles are now aligned along their bottom edges and they are evenly spaced horizontally. With the three rectangles still selected, right click an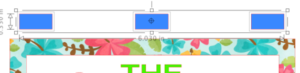 d select Group. Now move them into position just above the top edge of the frame.
Cut the Vinyl
In the Cut Settings window, make sure that all lines are set to Cut. Select Vinyl from the Material Type part of the Cut Settings window. Click on the Advanced button.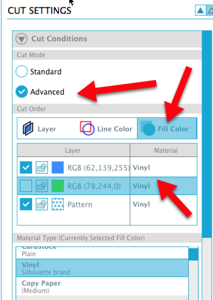
Make sure you are working in the Fill Color tab in the Cut Order area. Check to make sure tht the material type is set to Vinyl for all three colors. Uncheck the green color.
Scroll down and check the settings for your ratchet blade. Remember, you must adjust this setting manually if you are using the Cameo 2. If you are using a Cameo 3, make sure the correct blade position and blade are selected. Load your patterned vinyl on the mat and load it you’re your Cameo. Click on Test cut and perform the Test. This will allow you to check your settings before cutting your vinyl. Once the test cuts correctly (the vinyl cuts but the carrier sheet does not), click Send to Silhouette. To cut the green vinyl, uncheck the Patterned vinyl in the Cut Order and check the green. Cut your vinyl.
Finish the Project
Once your vinyl has been cut and weeded, place transfer tape on top of one of the green vinyl. Bend the carrier sheet back from the top of the vinyl so that the alignment boxes are no longer on the carrier sheet. Position the alignment boxes over the alignment boxes on the patterned vinyl piece. Remove the rest of the carrier sheet from behind the green vinyl, smoothing the transfer tape down over the patterned vinyl as you go. Now adhere the vinyl to the glass of your picture frame. Or, you can cut a piece of overhead transparency film and position the vinyl on it. Place this behind the glass in the frame. This will allow you to reuse the frame for other sayings.
Products Used
- Oracal 651 adhesive vinyl
- Patterned vinyl from sparkleberry.com
- Transfer tape – I used Oracal Transfer Tape – available from swingdesign.com.
- Overhead transparency film purchased from the office supply store
If you enjoyed these tips, please join my Facebook groups … Libby’s Silhouette Group — Tips, Tricks, Tutorials and Projects, Libby’s Craft and Sewing Group and Running With Sisers – Juliet and Romeo. You can also find me on FB at Libby’s Loft.com. Please join and feel free to ask questions and share your creations! I look forward to seeing you there!!
Until Next Time,
Happy Crafting!!
Disclaimer: Posts on this site may contain affiliate links. Clicking on one of these links or making purchases at linked sites does not mean you pay more for your purchases. It means I may receive a small commission on your purchase. This commission helps defray the costs of this site and enables me to continue to provide you with new and exciting content.
Until next time,
Happy Crafting!!