You’ve created your design and saved it “just in case.” Now it’s time to cut it out! You click on the Send tab …. but what do you click next? Let’s take the mystery out of all those buttons and options in the Send tab!
There are 4 tabs in the Send panel: Simple, Line, Fill and Layer (Designer Edition or above). We will explore each of these tabs individually, starting with Simple.
The Send window has two sides … the preview window on the left and the control panel on the right.
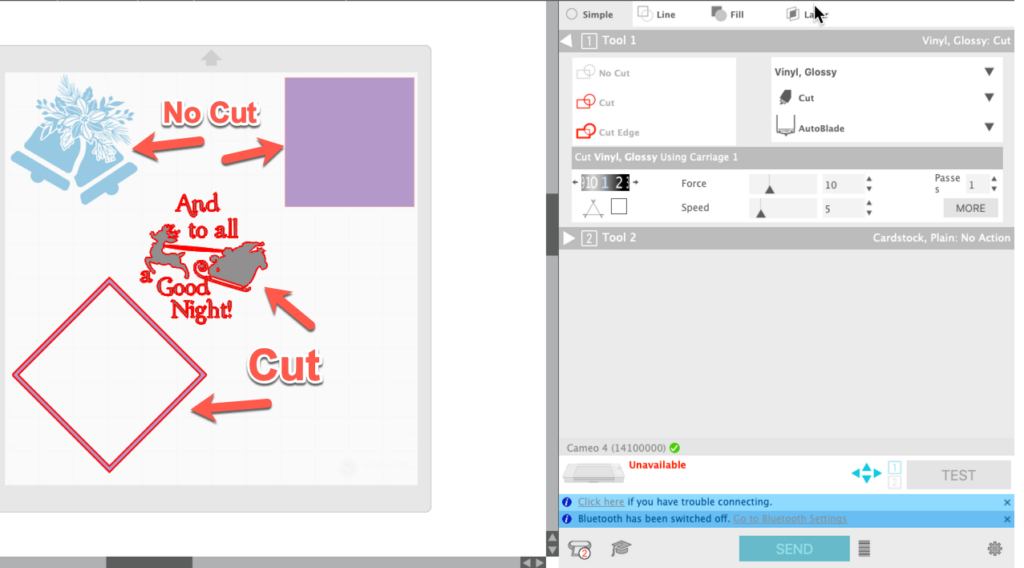
If you have a Cameo 3, Cameo 4, Cameo 4 Plus or Curio, you have a tool housing that will hold two tools. On the Cameo 3 and Curio, they are color-coded: Tool 1 is coded red and Tool 2 is coded blue. On the Cameo 4 family, the holders are coded 1 and 2. You will need to make sure you are applying your settings for the correct tool.
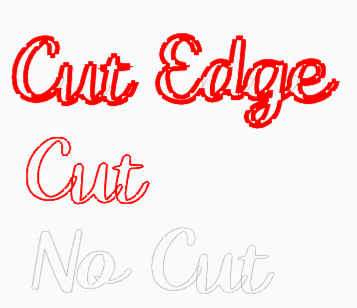
Items that are set to Cut or Cut Edge will have bold lines around them in the preview window. Items set to No Cut will not have bold lines.
You can select items in the Preview window and change them from to Cut, No Cut, or Cut Edge.
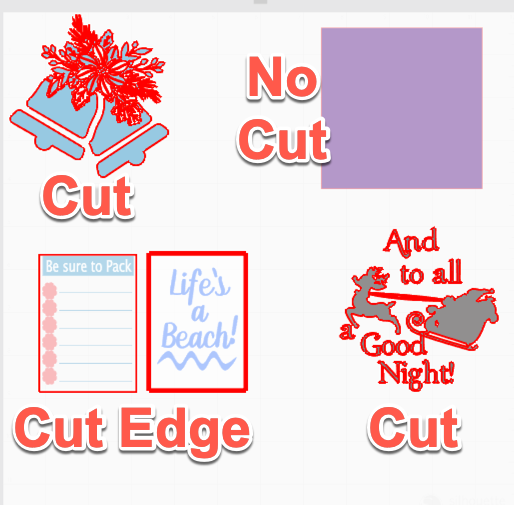
No Cut means just that …. the selected item will not be cut even though it remains on the virtual mat.
Cut means that all the cut lines in the design will be cut.
Designs set to Cut Edge will only be cut around the outer lines and will ignore any cut lines inside the larger image. In the image below, you can see that the column of dots and the rows of lines are design elements but they will not be cut because the entire design is set to Cut Edge.
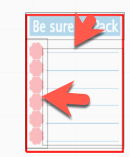
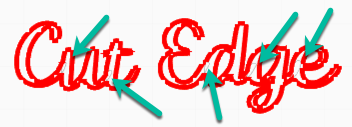
Text is now set to Cut Edge by default. Why does this matter? If you are using a script or other overlapping font, you do not want the areas of overlap to be cut.
Setting Text to Cut Edge will keep that from happening. Here’s how this looks in the Preview window. You can see that the overlaps are not going to be cut. In previous versions of the software, you had to Weld the text to keep the overlaps from being cut. This meant your text was no longer text and could not be edited if you needed to change it. Using Cut Edge keeps the text editable.
NOTE: Designs have to be selected in the workspace to set them to Cut, No Cut or Cut Edge. If you send your job to cut and your cutter does not cut and the software displays a “Cut Complete” message, check your cut lines. This usually happens when the design is set to No Cut.
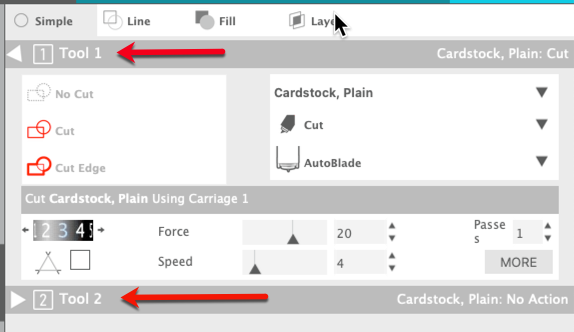
The next section allows you to select the material type, the type action (cut, etch, draw…) you wish to use and the tool you will be using.
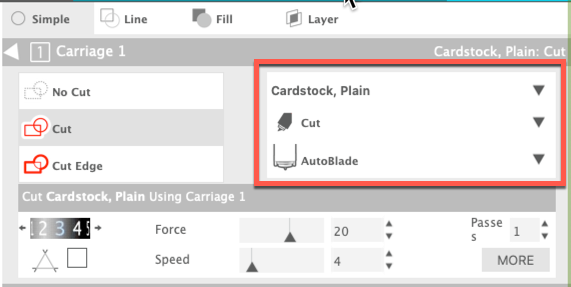
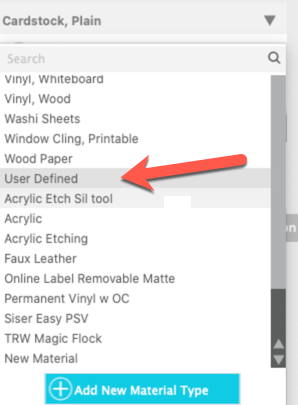
Click on the dropdown next to each of these elements to change the options. When you click on the Material dropdown, you will see an alphabetical list of recommended settings for a variety of common materials. You can scroll through the list to locate the material you will be using.
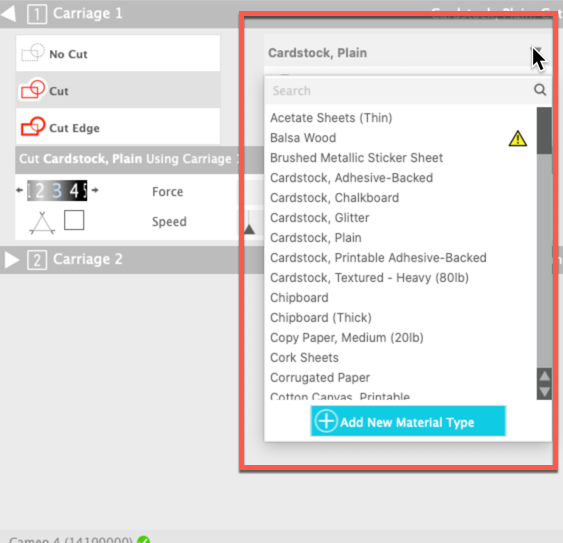
If you have created a custom setting for a material you use frequently, those settings will be at the bottom of the list in alphabetical order under the heading “User Defined”. If you create a new setting, it will appear at the bottom of the list until you close and reopen your software.
Sometimes you will see a display that looks like this. Don’t be alarmed. To correct this, Click on the dropdown arrow next to Auto (No Action) and select the action you want to use. Then click on the dropdown arrow next to (No Tool Detected) and select the tool you will be using. You should now see the settings for that material, action and tool.
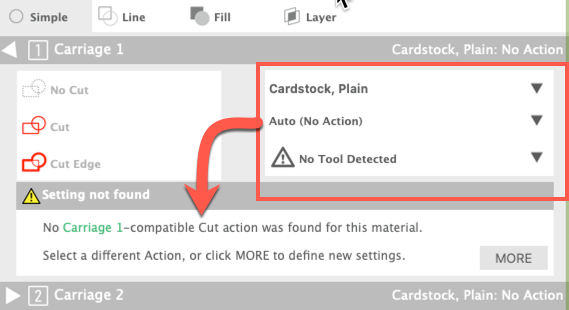
If you are using a Cameo 4 and have your Cameo plugged in and turned on, the software should recognize your tool automatically.
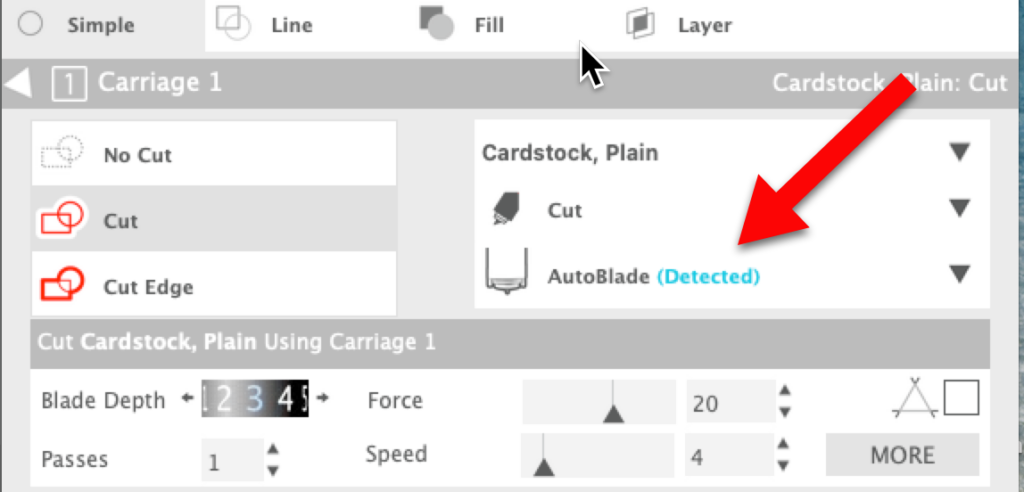
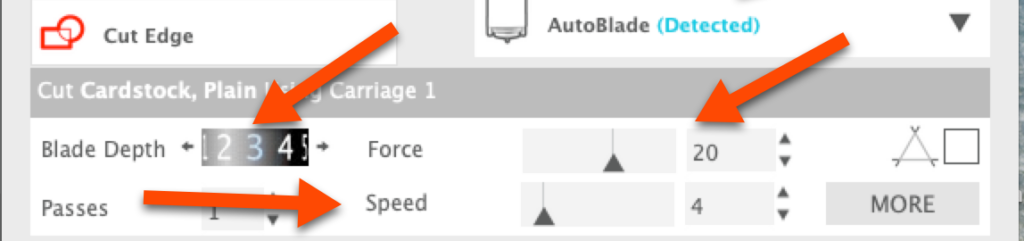
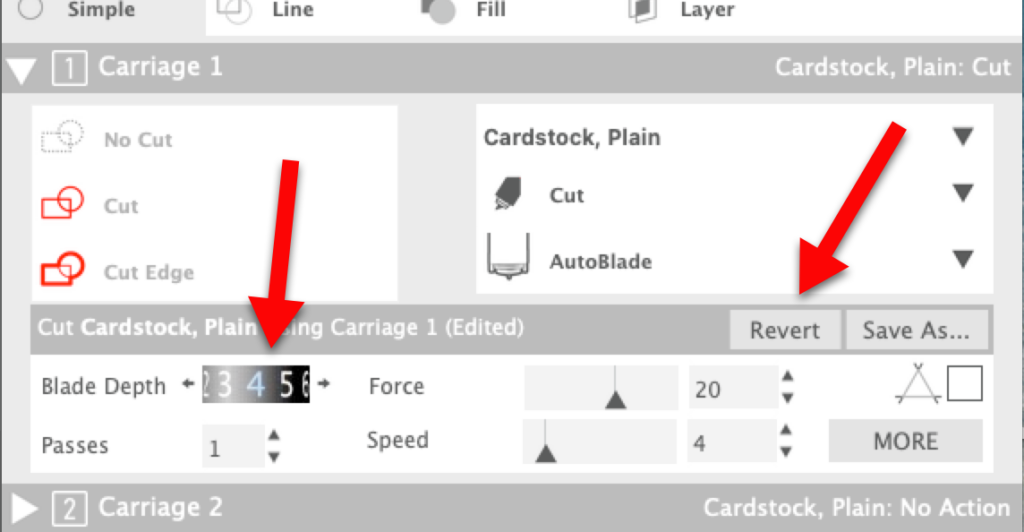
The Blade Depth is how far the blade will extend out of the blade holder. The thicker your material, the more blade will need to be exposed to get a good cut. If you set your blade depth too high, the blade can drag or become caught in the material and this can cause cutting issues.
Force is the downward force that the cutter applies to your blade as it cuts. Sometimes increasing the force instead of increasing the blade depth is the answer to getting a good cut. Do not be afraid to use this setting.
Speed is just that … how fast the machine will cut. I often find reducing the speed results in a better cut, particularly with tricky materials.
Overcut is the triangle with the extended corners. To activate Overcut (also known as Line Overcut), click in the box next to the triangle. When Overcut is selected, the blade will extend a small distance beyond the end of a line (the default is 0.10mm), the blade will lift and change direction and begin cutting the next part of the design. This can be a very useful tool and we’ll explore it in detail in another post.
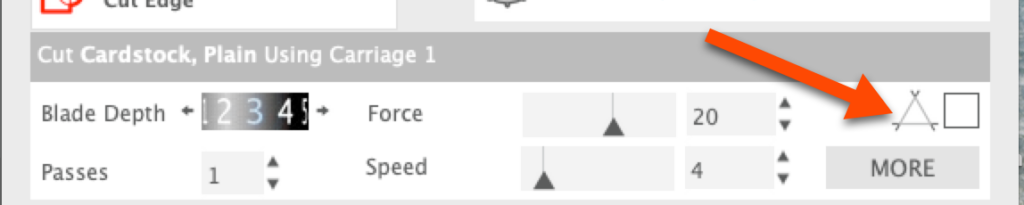
Passes is the number of times the design an action will be repeated. For most materials, one pass is sufficient. Thicker materials may require a series of cuts in order to be completely cut. I find rhinestone flock requires two passes for a clean cut.

The More button is where you find advanced settings and where you can create your own User Defined Settings.

The software will adjust the settings based on the material you have selected. If you are using an Autoblade, the information will be sent to your cutter and your blade will automatically be adjusted. If you are using a blade that has to be manually adjusted, you will need to adjust the blade depth yourself.
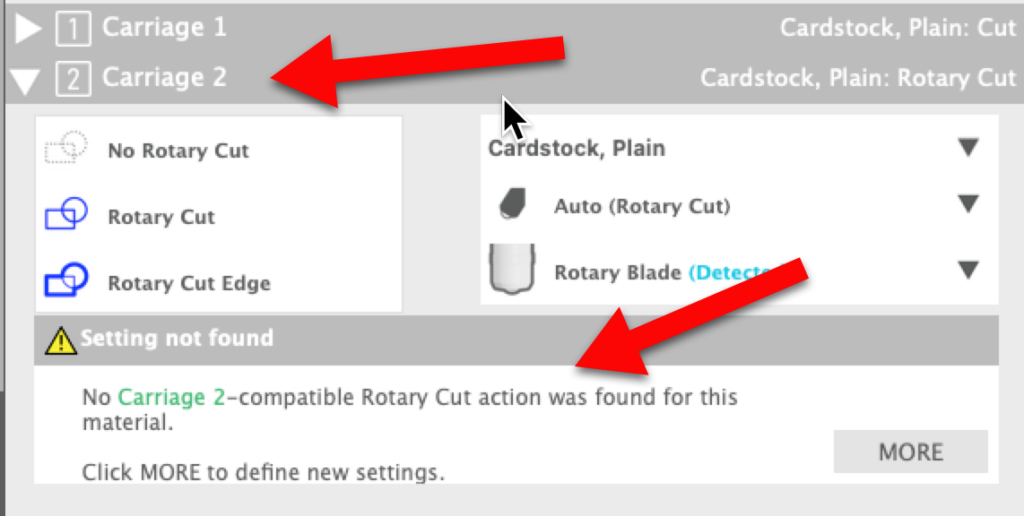
In this example, the software detected that I had a rotary blade installed in Carriage 2. But when I click to expand the Carriage 2 settings, you see that no compatible action was selected. The rotary blade is not designed for use with card stock. In this case, the blade in Carriage 2 will not be used. Just click on the arrow to close this.
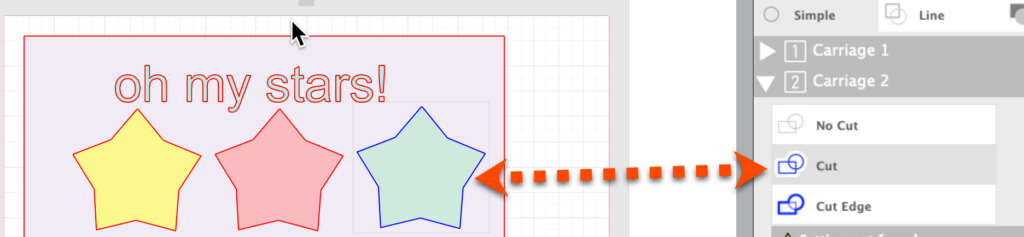
If I select a blade and material that are compatible with Carriage 2, the items in my design to be cut with that tool will have blue cut lines instead of read cut lines. Notice that the No Cut, Cut and Cut Edge listings in the Carriage 2 section are also blue.
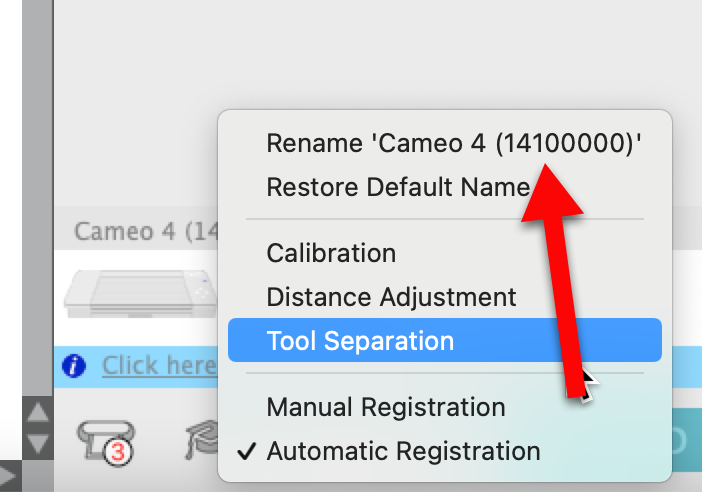
At the bottom of the panel, you can see your machine. Right clicking on the name of the machine opens a menu where you can rename your machine. This is helpful if you have multiple machines. You can also perform some other actions like Calibration, Distance Adjustment, Tool Separation, Manual Registration and Automatic Registration (the last two are used in conjunction with Print and Cut).
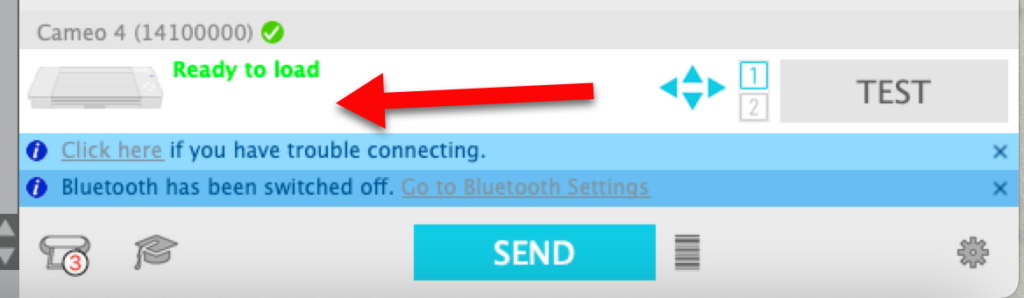
If the Cameo is plugged in, you may see “Ready” or Ready to Load” depending on the version of the software you are using. I am using v4.4.880 (a beta version), so I see “Ready to Load.”
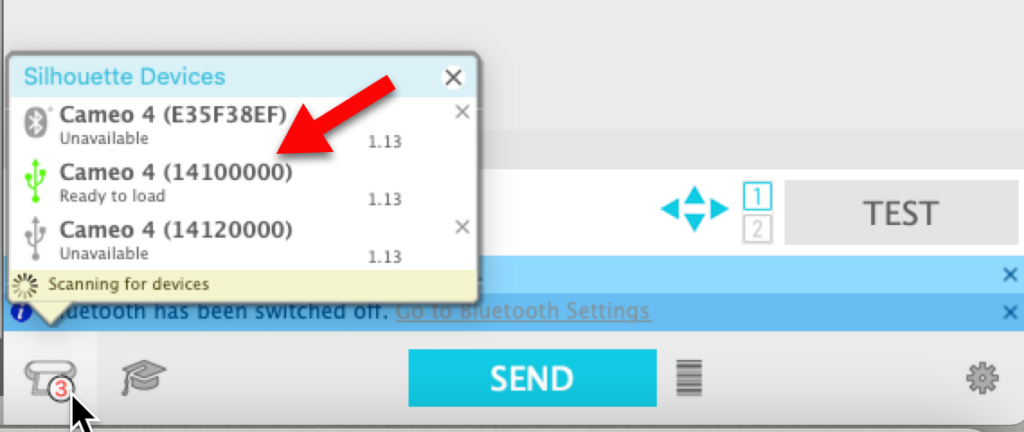
If you do not see Ready to Load, click on the small image of a cutter in the lower left corner. You will see any machines you have connected to your computer. You may also see machines you have previously connected but are not currently using. Look for the one that says Available and click on that. You can delete machines you do not want to keep in the list by clicking on the small ‘x’ next to the name of the machine. Look for the one that says “Available” and select that one.
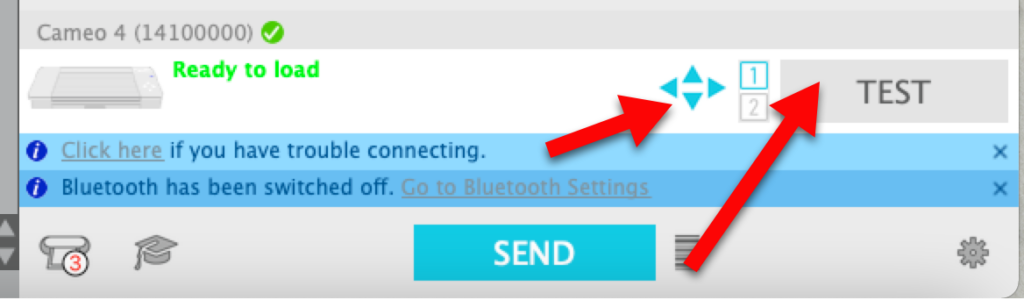
You will want to do a test cut before sending your job to cut. Load your mat and press the Test icon. A small square with a triangle inside will be cut in the top left corner of your mat workspace. If you have not place your material in the top left corner, you can use the scoocher buttons just to the left of “Test” to move the blade into position so your test is cut on your material and not on your empty mat. You can also use the scoocher buttons to move the test cut if you have made adjustments and need to check the new settings. Make sure you do a test cut using the correct tool. The tool selector for the test cut is right next to the Test icon.
If your test cut is not successful, you can override these recommended settings and make adjustments. When you make adjustments, the software will add Revert and Save buttons above the settings part of the Send tab so you know you have made a change. I never save adjustments to the default materials. You will want to remember to use your scoocher buttons to move the test cut over after making adjustments to the settings.
When your settings are correct and you are ready to cut, click on the Send icon and the job will be sent to your cutter. Depending on the size and complexity of your design, it may take a few seconds for the cutter to begin to work. Don’t panic.

There are a few more icons in the bottom part of the Send panel. You will find an icon for Instructions, creating a bar code and Advanced Settings.

Advanced Settings: the Advanced Settings are not a place that most users will ever need to go. However, there are some settings that you may find useful.

We won’t examine them in detail, but here’s an overview of each of these settings.
After Cutting a Tile: Tiling is a feature in Business Edition that allows a larger project to be cut into sections. This setting chooses “Await Cutter Ready” or “Pause“. You can learn more about tiling here.
Feed Options: Return to Origin will return the mat or material back to the start point when the job is complete. Feed will continue to feed the material forward. This is helpful when cutting from a roll of material like vinyl.
Layer Sorting: No Sort cuts the objects in the project in exactly the order they appear in the Layers Panel. Group Layers by Condition allows layers to be grouped by condition.
Show Cutter Divisions: Choices here are Known Cutters and All Cutters.
Show Weed Settings: Choices here are Auto, Always and Never.
Cut Order Sorting: These settings allow you to control the cut order for your projects. No Sort will cut objects in the order they appear in the workspace. Maximize Speed sets the design to cut as quickly as possible. Minimize Roller Movement minimizes roller movement which can aid in cutting intricate designs. Sort Interior Contours First sets the insides of objects to cut first instead of being cut in order with the outsides of the objects.

Wow!! That was sooo much information! Aren’t you glad this is the Simple Tab!! We’ll explore the Line, Fill and Layers tabs in the next few posts, so check back to see how each of these other options can help with your workflow.
If you enjoyed these tips, please join my Facebook groups … Libby’s Silhouette Group — Tips, Tricks, Tutorials and Projects, Libby’s Craft and Sewing Group and Running With Sisers – Juliet and Romeo. You can also find me on FB at Libby’s Loft.com. Please join and feel free to ask questions and share your creations! I look forward to seeing you there!!
Until Next Time,
Happy Crafting!!
Disclaimer: Posts on this site may contain affiliate links. Clicking on one of these links or making purchases at linked sites does not mean you pay more for your purchases. It means I may receive a small commission on your purchase. This commission helps defray the costs of this site and enables me to continue to provide you with new and exciting content.