Now that we’ve made it through all the options in the Send Panel — Simple tab, let’s look at the Line tab. This is often called “Cut by Line” but the tab simply says “Line”.
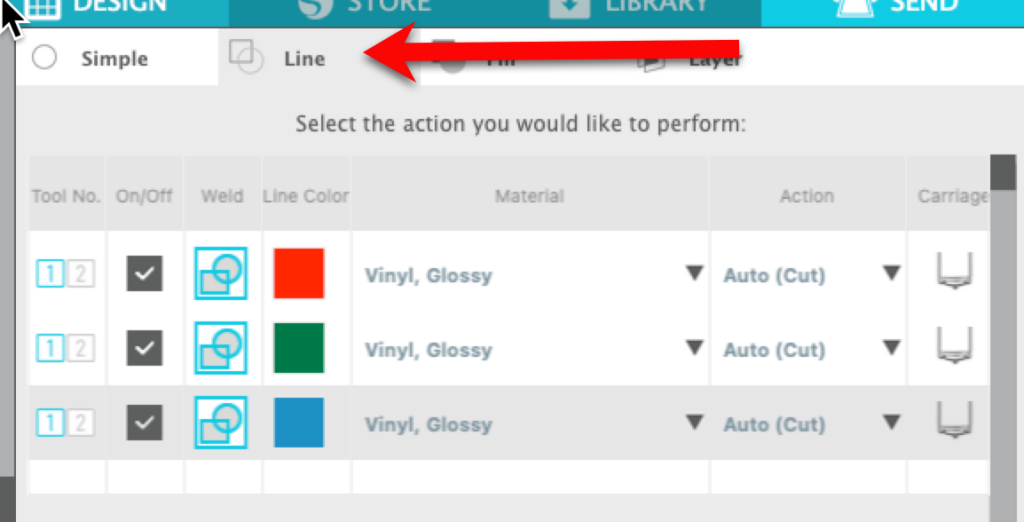
This tab will allow you to cut items by line color. You can turn colors on and off by checking the box in front of the color. This way, you don’t have to move objects around on the workspace and you can also perform multiple actions — like drawing and then cutting in one project. So let’s get started!
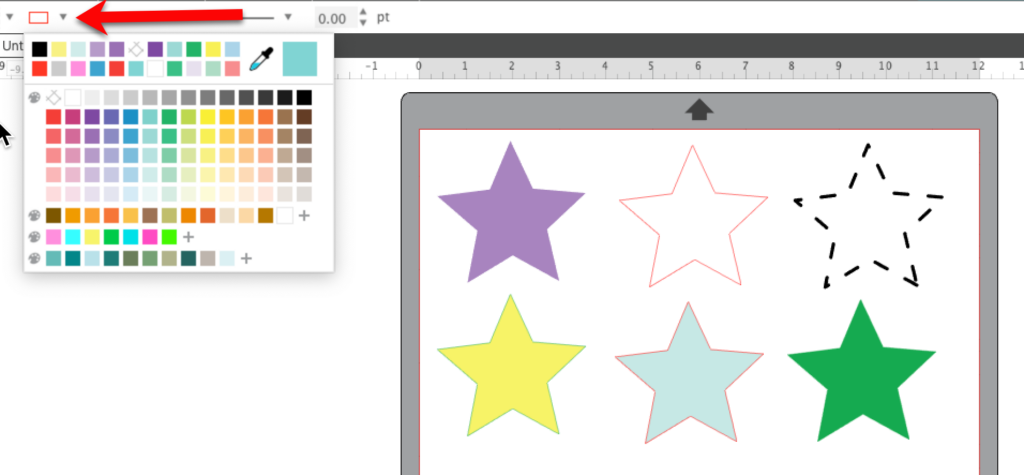
I created a group of stars using the FlexiShape tool for this example. Then I used the Line Tools in the Quick Access toolbar to change the color and style of each of the stars. Use the Line Tool color icon to change the color of the line around the shape. Then I used the Line Style tool in the Quick Access toolbar to change one of the lines from a solid line to a dashed line.
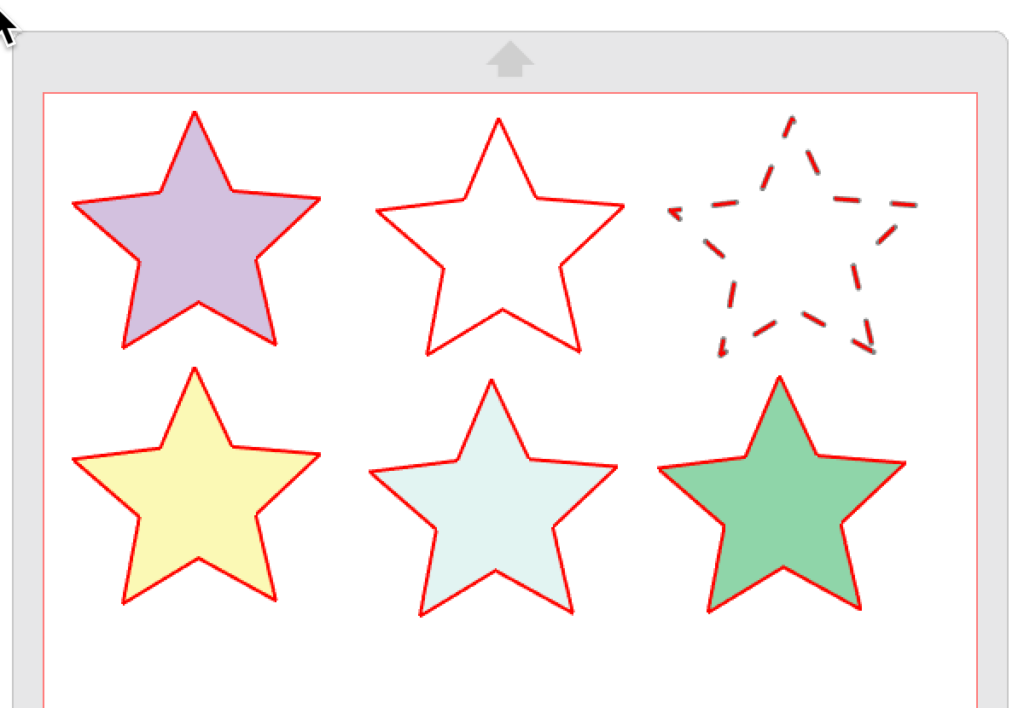
Let’s look at these stars in the Send Panel. In the Simple tab, all the stars are set to cut so all the stars have darker red lines around them. For more details on using the Simple tab, click here. In this example, all the stars will be cut.
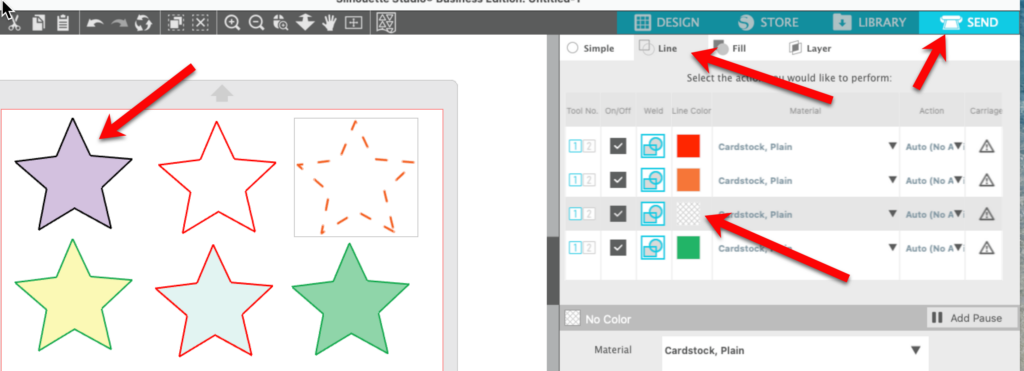
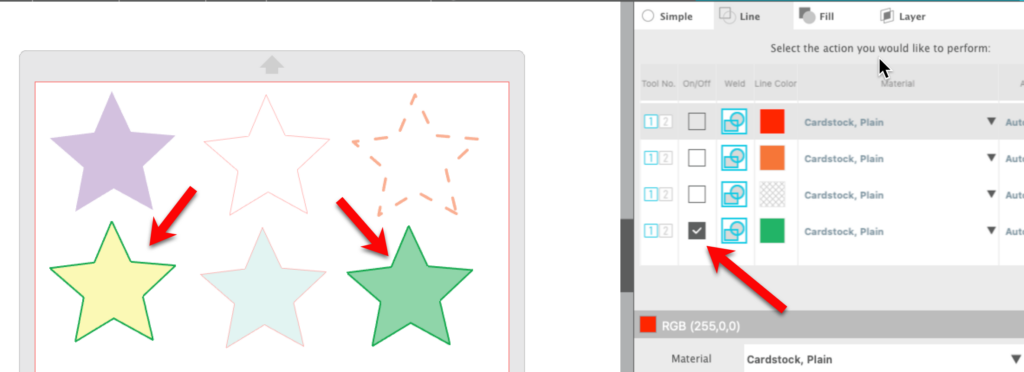
Click on the Line tab in the Send panel. This is where you can specify which of the stars you want to cut using the line color assigned to the individual star. Here’s how my stars look in the preview window when using Cut by Line Color. Notice that the first star has a black cut line in the preview window but there is no black in the list of colors — that’s be cause the line color for that star is transparent (no color) so the software assigned a color for preview purposes.
To cut only one color, uncheck all the other colors in the list In this case, I only want to print the yellow star with the green outline and the green star with the green outline. I unchecked all the other colors in the list. Notice that selecting by line color will ignore the fill color. The green outlines appear bolder and all the other line colors are muted. This is my visual confirmation of the choice I made.
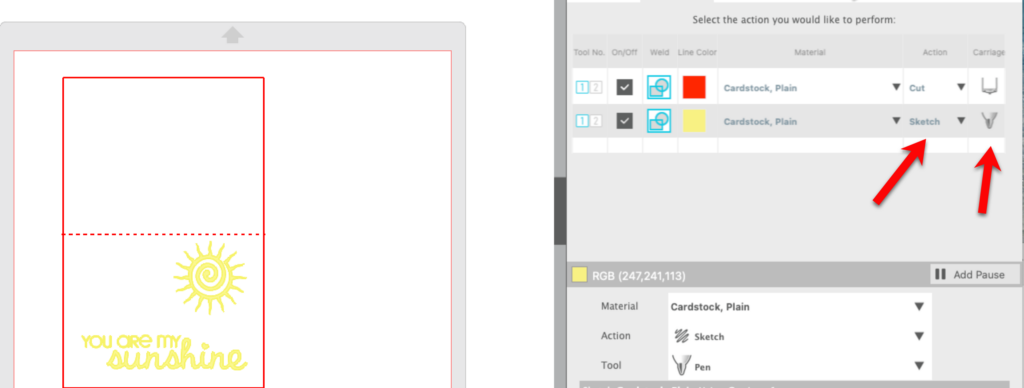
In the case of this quick card, the lines for the card are red and the lines for the sentiment and design are yellow. I want to draw the sun and the sentiment using my sketch pens and then cut the card. The sun and sentiment have yellow lines and the card has red lines. Notice I have changed the Action on the sun and sentiment to Sketch and the tool to the pen tool.
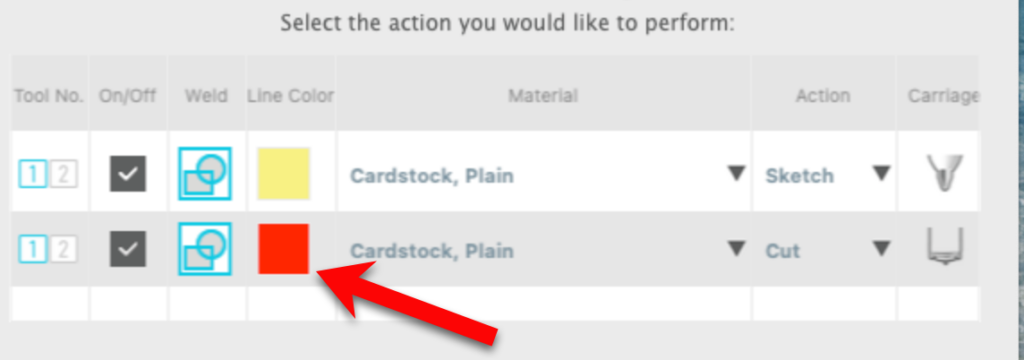
I want to draw first and then cut so the elements are in the wrong order. I could just uncheck the red lines and use my sketch pens, then select the red lines and use my blade to cut the card. I can also put the software to work for me. If I left click on the color box for the red lines and drag it down, I can change the order of the elements in this window.
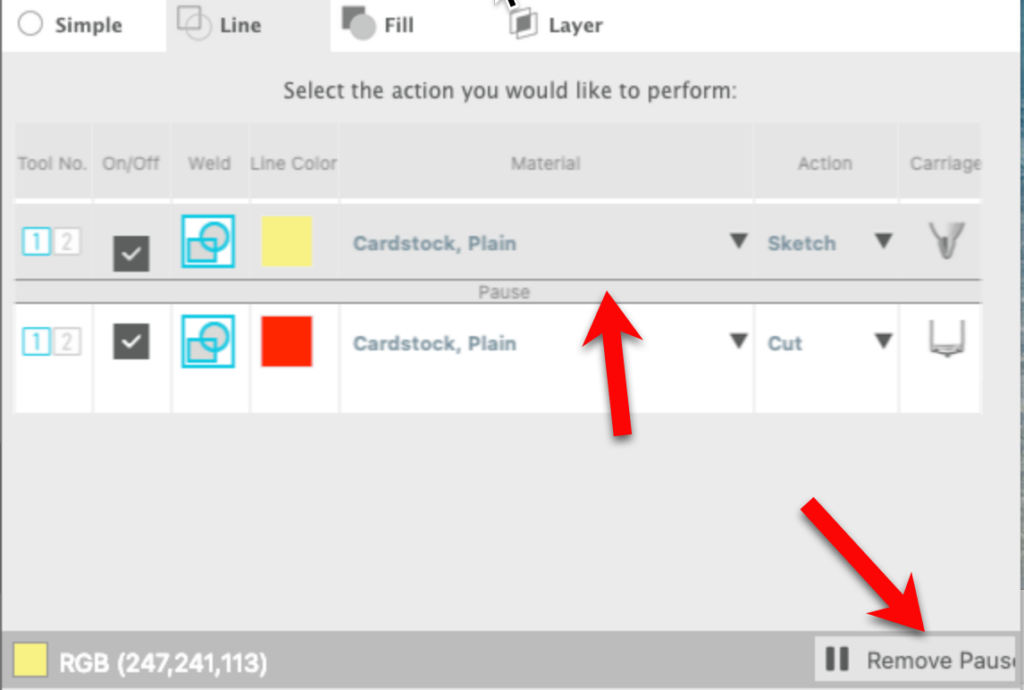
I could still just check and uncheck the colors to perform the two different actions. But there is another tool that you can use when performing multiple actions using different tools. We can use Pause. To add a Pause between two colors, either right click on the color box or click on the Add Pause icon in the lower right are below the colors.
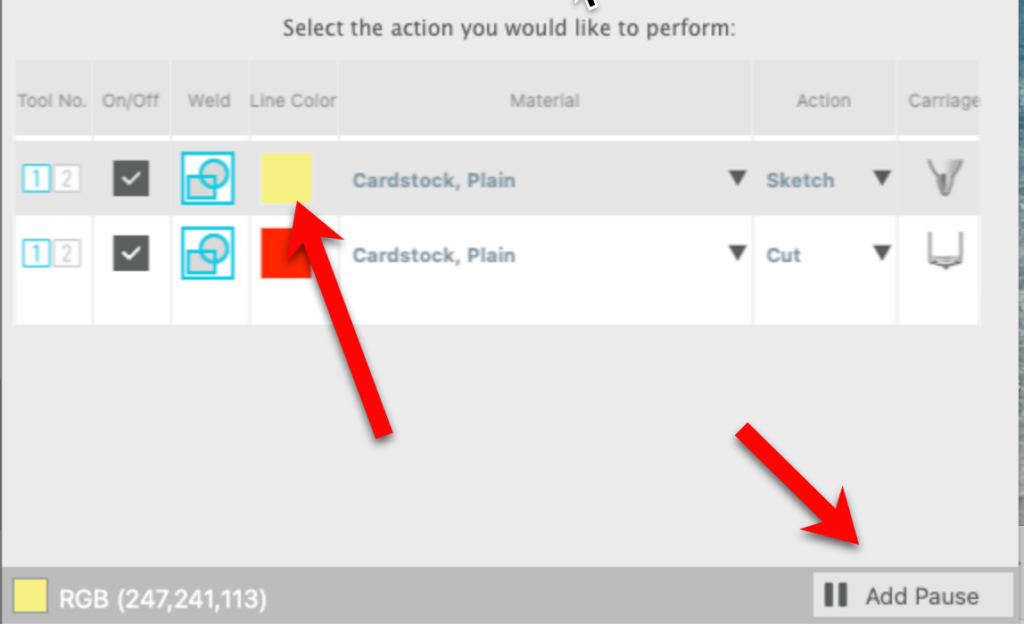
You can tell a Pause has been added because there is now a Pause bar under the yellow line color information. You can also see that now, instead of “Add Pause”, the button in the lower right corner says “Remove Pause.”
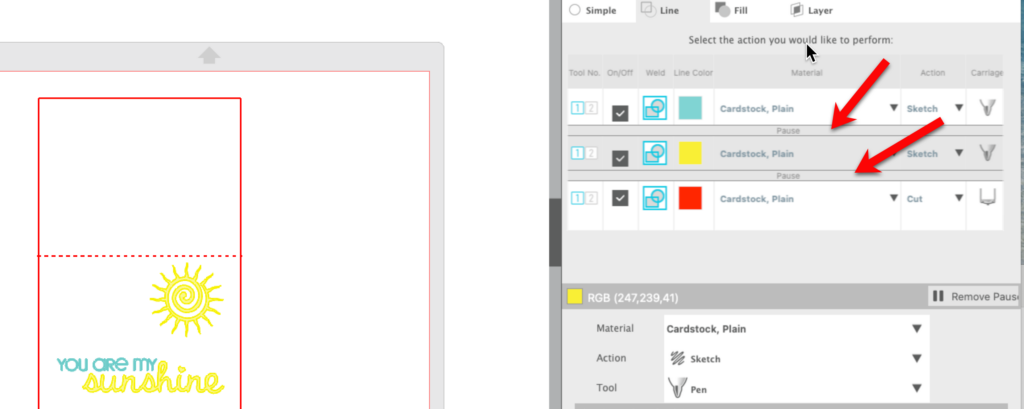
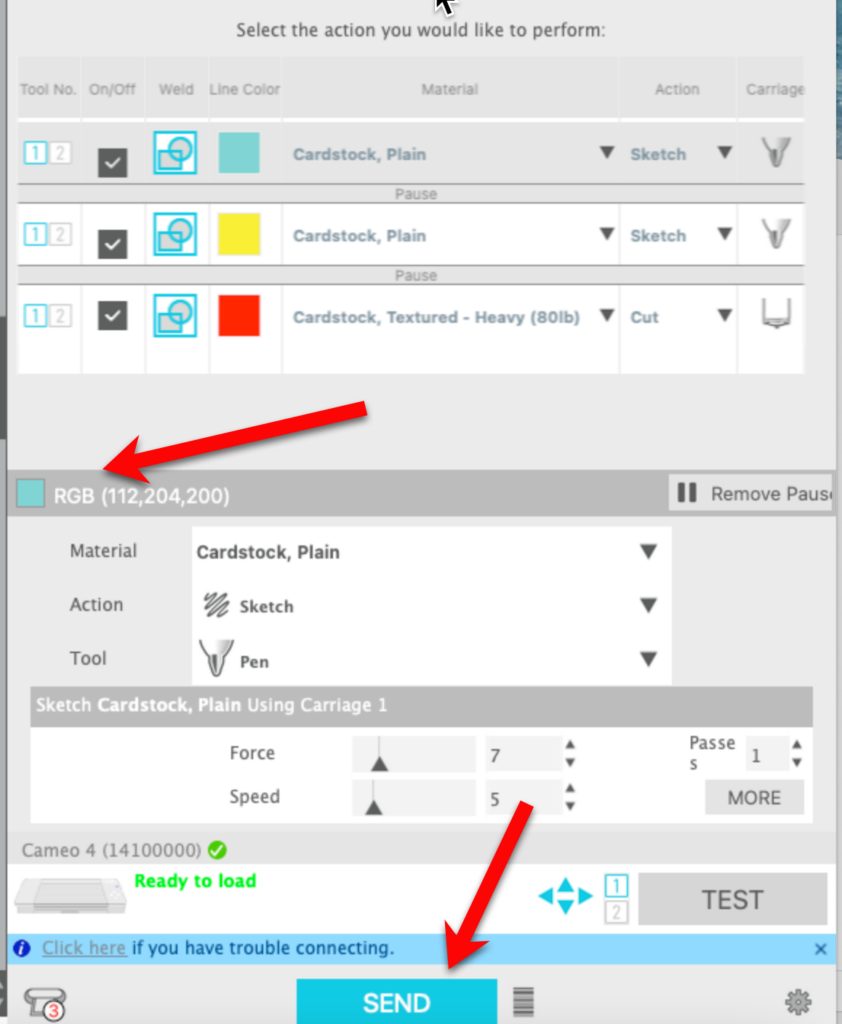
The ability to add a pause can be very useful if you need to change plan colors or if you need to change tools. In this example, I want part of the sentiment to be one color and part of it to be another color. I added a Pause between the aqua and yellow so I could change the pens and then a pause after the yellow so I could change to my blade for cutting.
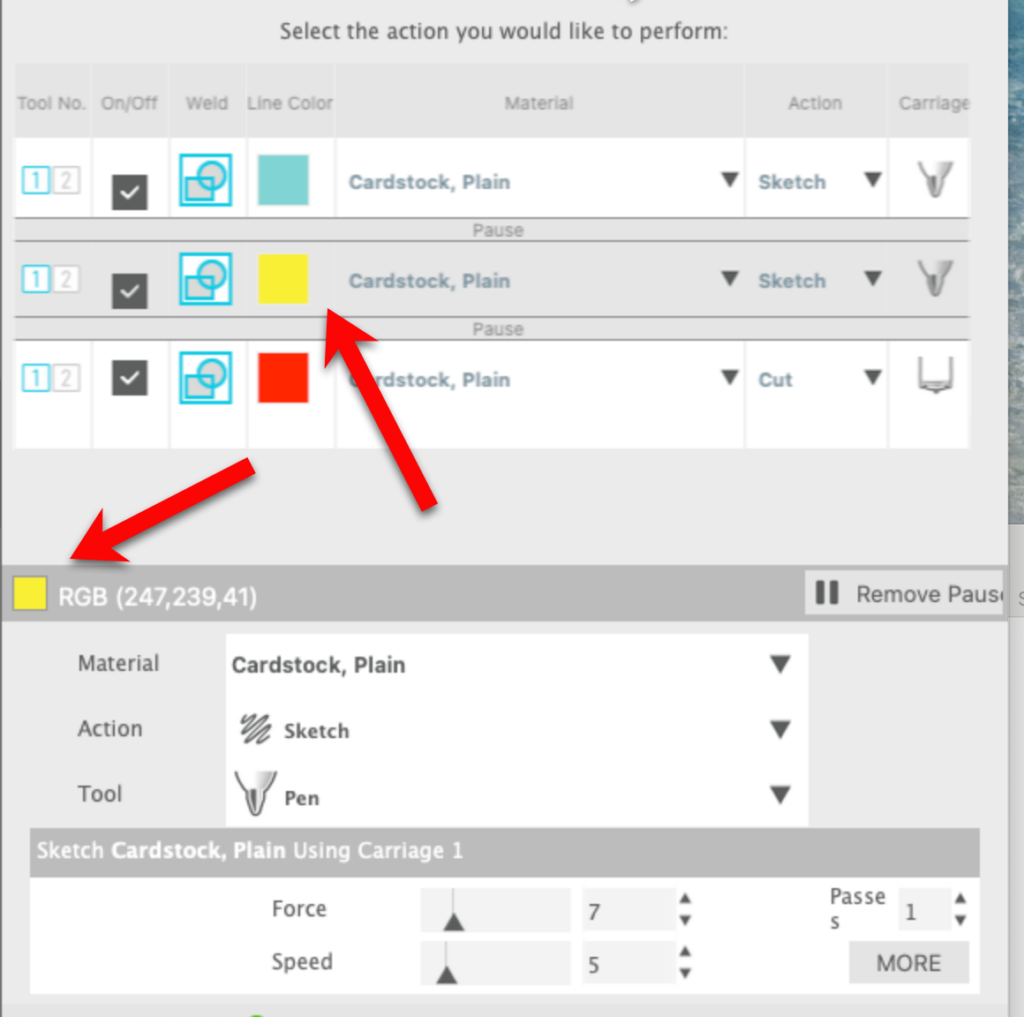
Before sending your job to cut, you can click on each color and check the settings for that color. Here I have selected the yellow sketch action. Notice that in the settings, I can see that I have the yellow selected and then can check the settings for that pen. This is helpful if you are using different types of pens that need different force or speed settings.
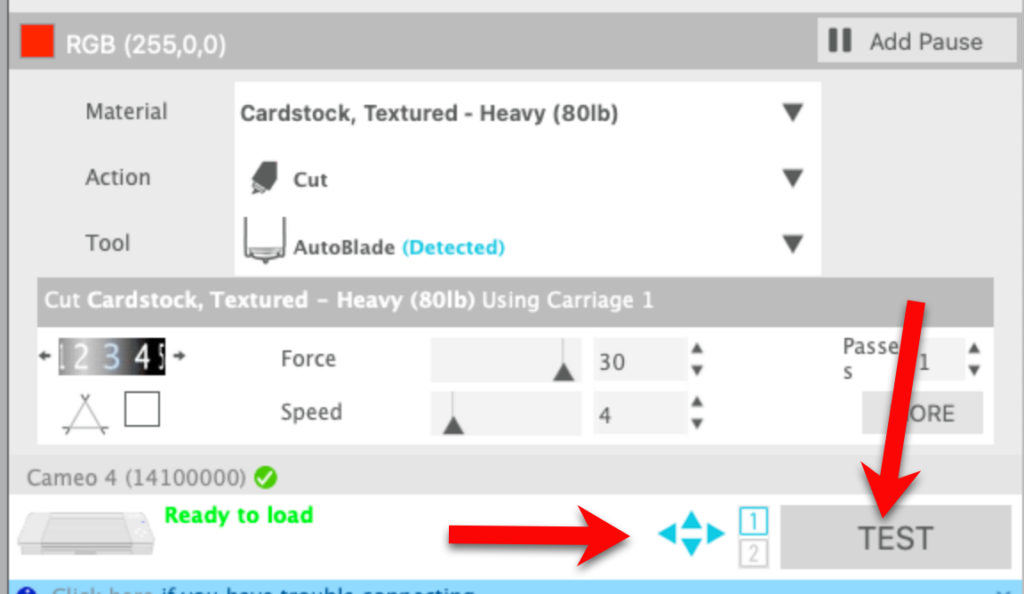
I can also check the settings for each part of this design before I send the job to the Cameo. I can select each of the parts individually and perform a test cut to check the settings and make any needed adjustments before I send the job to the Cameo. I also do a quick check in the Preview window to make sure the correct part of the design is selected. Below I have selected the Cardstock and and can perform a test cut to check the cut settings. You can move the placement of the test cut by using the scoocher buttons next to the Test button — this allows you to check each part of the design or perform multiple tests if adjustments are needed.
Once I have checked all my settings, I am ready to begin. Click on the top color to select it. Look at your settings to be sure the correct element will be cut and that your settings are correct and click Send. When the first element is finished, the machine will pause and you can change the pen. Press Send again. Finally when the machine stops again, change to the correct blade and press send one more time.
And there you have it …. all the details and features of the Cut by Line color tab in the Send panel. I hope you find this helpful as you create more complex designs.
If you enjoyed these tips, please join my Facebook groups … Libby’s Silhouette Group — Tips, Tricks, Tutorials and Projects, Libby’s Craft and Sewing Group and Running With Sisers – Juliet and Romeo. You can also find me on FB at Libby’s Loft.com. Please join and feel free to ask questions and share your creations! I look forward to seeing you there!!
Until Next Time,
Happy Crafting!!
Disclaimer: Posts on this site may contain affiliate links. Clicking on one of these links or making purchases at linked sites does not mean you pay more for your purchases. It means I may receive a small commission on your purchase. This commission helps defray the costs of this site and enables me to continue to provide you with new and exciting content.
Until Next time,
Happy Crafting!!
Disclaimer: Posts on this site may contain affiliate links. Clicking on one of these links or making purchases at linked sites does not mean you pay more for your purchases. It means I may receive a small commission on your purchase. This commission helps defray the costs of this site and enables me to continue to provide you with new and exciting content.