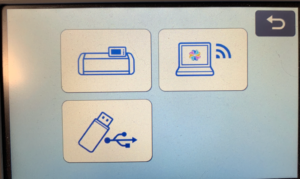
Scanning documents with your Scan ‘n Cut is easy once you understand the basics! When you choose “scan” in the menu on your Scan ‘n Cut, you see three choices.
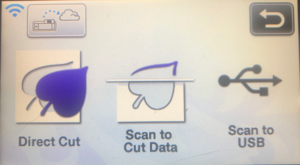
- Direct Cut – scan an image and cut the outline
- Scan to Cut Data — creates a cut file that can be saved as data and used in Canvas or other software
- Scan to USB – creates a file that can be saved in image format (saves as JPG)
To get a good scan, you want to start with a clean, crisp image. Your page should be as clean and uncluttered as possible. You will get the best results if your image is not blurred and has no gradients. If you decide to trace your lines to darken them, use smooth even strokes so your lines will be easier for the Scan ‘n Cut to trace. It is also better if your image has less detail rather than more.
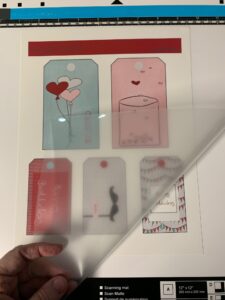
No matter which scanning option you are going to use, you will need to load your image on the mat. You can use your cutting mat or you can use the Scanning Mat. The advantage of the scanning mat is that the Scan ‘n Cut will NOT cut when you are using the scanning mat. There is a plastic cover on the scanning mat that will keep your image from moving since the scanning mat is not sticky.
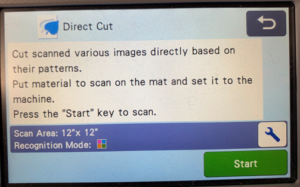
Direct Cut
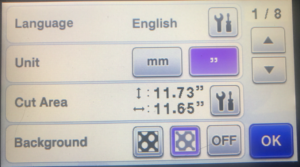
When you select Direct Cut, you will be scanning your document for immediate cutting. In the dialog box, you will want to confirm the size of the area you will be scanning. You can also adjust the Recognition Mode, if needed. Press the Wrench icon to change the size. Changing the Recognition Mode from Color to Greyscale (or vice versa) may result in a better scan.
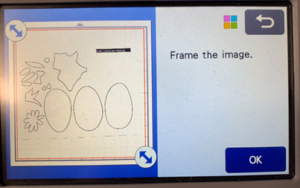
Press Start and the mat will be fed into the Scan ‘n Cut and the image will be scanned. The scanned image will be displayed on the screen. Use the blue two-headed arrows to frame the image as closely as possible. The closer you frame the image, the more background “noise” you eliminate. When you press OK, it will take a minute or two for the desired scan area to be recognized. You may see a dialog that says “Recognizing”. Just be patient.
The newly framed image will appear on the screen. At this point, you can make additional adjustments to the scanned image by limiting the number of colors.
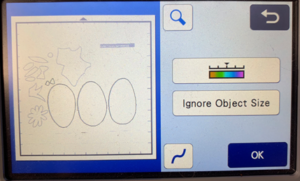
You can also set a minimum size for objects that will be recognized in order to eliminate more debris. Press the Ignore Object Size icon. You will get a window that allows you to set the adjust the minimum size. Once you have adjusted the size, press OK to exit this screen.

The next screen allows you to access screens for adding an offset or doing additional editing of the image.
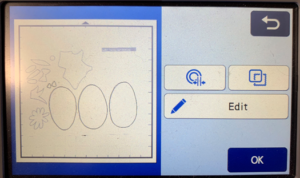
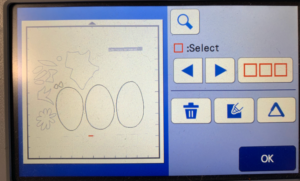
Press Edit if you need to clean up the design or remove debris. You can use the arrow keys to move from object to object and press the Trash can to delete the objects.
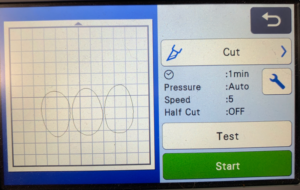
Once editing is complete, press OK and move to Cut window. Select Cut as your action. Make any adjustments to settings — like turning on your Half Cut option. I recommend that you add a test cut to check your settings before cutting. (Make sure you move the test cut into the area where it will be on your material!) Press Start and cut your objects! It’s that simple!!
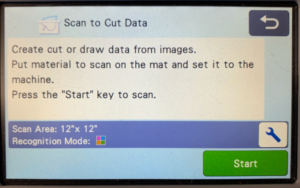
Scan to Cut Data
Scan to Cut Data will allow you to scan an image so it can be used as cut data and/or manipulated in your software. This is different from Direct Cut because those files cannot be saved or manipulated.
Begin by confirming the size of the area to be scanned. The default area is 12″x12″. Some Scan ‘n Cuts can scan a 12×24 area but not all can do this so be sure to check the manual for your SNC before you try a large scan. You can also change the Recognition Mode, if needed. Sometimes a color scan is better and sometimes using greyscale will result in a better scan. Press Start.
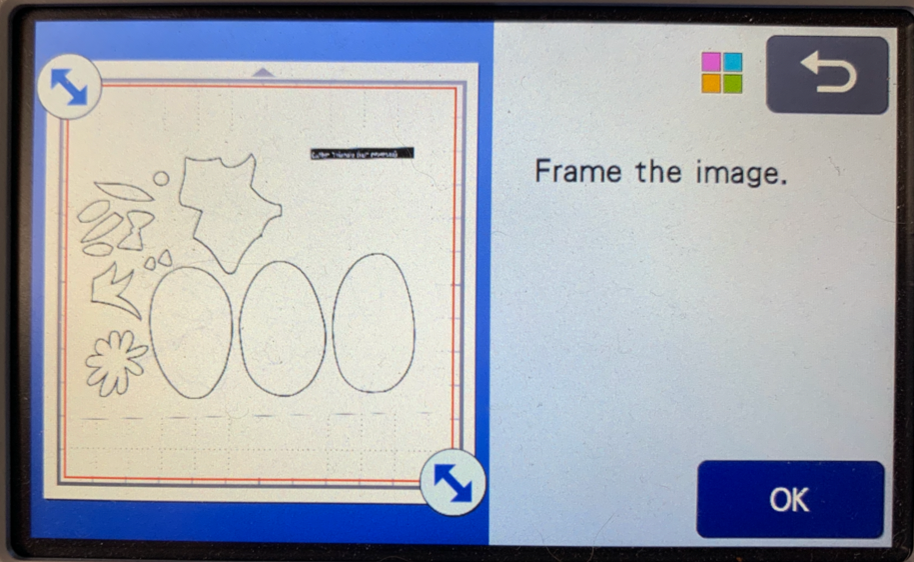
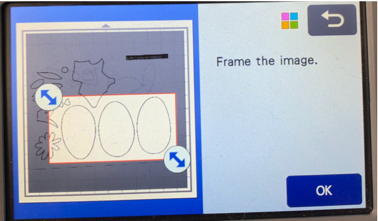
When the scan is complete, you can isolate the area you want to include in your cut file. Drag the blue two-headed arrows and do your best to frame the desired items. Don’t worry if there are “extra” parts in your framed area — you can delete later.
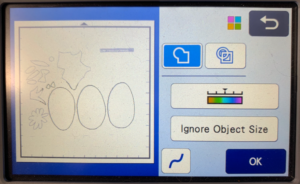
Select desired cut method — Outline only or Inside and outside lines. Adjust number of colors, if needed to fine-tune your selection. Use the Ignore Object Size button to change the size of the smallest object that will be included in your scan if needed to fine-tune your selection. Press OK to continue.
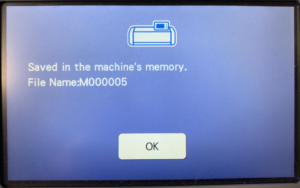
Select where design will be saved. You can save to your Scan n Cut, to a USB device or to your computer using Bluetooth (if available on your SNC).
Your design will be saved. If it is saved to machine, it will be given a file name, using sequential numbering. The design can now be loaded from the Saved Data screen on your Scan n’ Cut or manipulated on computer.
Scan the Mat
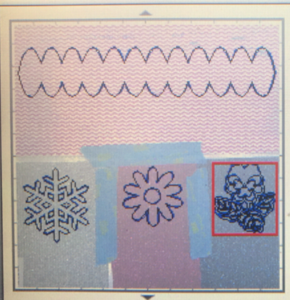
This is absolutely my favorite thing about the Scan n Cut!! The ability to load my materials onto the mat and scan the mat so I can see exactly where to position my designs on the screen! It’s especially handy if I want to “fussy cut” to get a specific part of a fabric or vinyl!
Place all the materials you want to cut onto your mat.
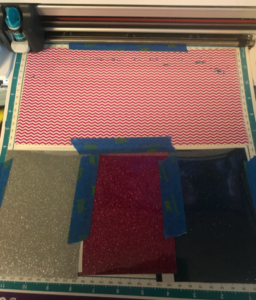
Load the mat into your SNC and press Scan Mat. You can now move your design elements around on the screen to make sure they are placed exactly where you want them on your fabric.
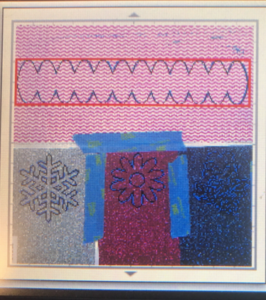
If you are having trouble seeing the design on the material, remember you can go into your settings and lighten the background image. Press the Settings button on your SNC. Change the intensity of the background and press OK.
Your scanned materials should now be lighter and it should be easier for you to see where to position your designs.
And that’s it … all you ever wanted to know about using the scanner features of your Brother Scan ‘n Cut! This blog was in response to a question from a reader so if you have questions be sure to let me know!!
Be sure to join my FB group, Libby’s Craft and Sewing Group, and post pictures of your creations!
Until next time,
Happy Crafting!!
Disclaimer: Posts on this site may contain affiliate links. Clicking on one of these links or making purchases at linked sites does not mean you pay more for your purchases. It means I may receive a small commission on your purchase. This commission helps defray the costs of this site and enables me to continue to provide you with new and exciting content.
Thank you Libby! This is a good road map of what is possible with the scanner. I am printing it out to put into my notebook to help refresh my memory on this!