My grandson is playing soccer for his school this year, so of course, Grandma needs to create her own spirit shirt. Retro words are “in” so I decided to use them for my shirt. And then I thought I would share the technique for creating them with all of you.

To get started, open your Silhouette Studio software. Click on the Text tool and move your cursor into the workspace. Left click to get a text placeholder and then type the team name. With the name selected, change the font to a bold font. I used Impact. I also added a fill color to my words. Adjust the size of your words to suit your project. I am making a shirt so my width is 9.5″.

Right click on the word and select Duplicate. Then left click and drag the duplicate word off the mat to use later.
Select the word still on the mat. Click on the Offset tool. Select Internal Offset. Adjust the amount of offset — I selected a value of 0.07. Click Apply.
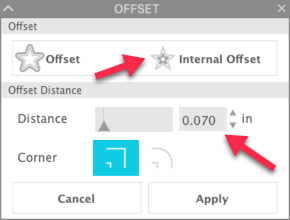
Left click and drag a box around the word and the offset. Right click and select Make Compound Path. I also changed the color of my design to the second of the school colors.

Click on the Page Setup icon in the right toolbar. Click on the Guide Settings icon. Make sure Snap to Guide is selected.
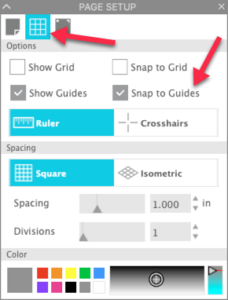
Click on the top ruler bar and drag a guideline down into the workspace so it is close to the middle of the word. Left click and drag the word so it snaps to the guideline. (The ability to use Snap to Guide is a just one of the great features of Silhouette Designer Edition. If you are still using the Basic edition, you can upgrade here. )
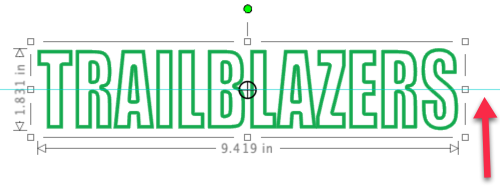
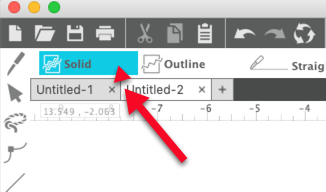
Click on the Knife tool. Make sure your knife is set to Solid not Outline.
Move the cursor into the workspace on the left side of the word, on the guideline. Hold down the shift key and move the cursor to the right side of the word. Left click. The software will process the line and cut your word in half. Before you do anything else, left click and drag a box around all the top shapes.

Right click and select Group. Repeat this step for the bottom shapes in the word. Now left click and drag the two parts of the word apart. Left click and drag the extra word back into the workspace.

Drag the three parts into position, aligning the outlines and the center word. Left click and drag a box around the three elements. Click on the Align tool and select Align Center.

In the case of my example, the letters are not lined up correctly so I zoomed in and aligned the left edge of all the letters manually.

Now for the fun. Click on the top outline group. Left click on the Replicate icon in the right toolbar. Select Advanced Replicate.
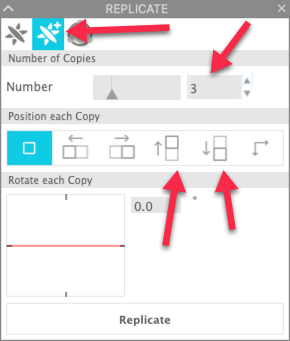
Change the Number of Copies to your desired number. I selected 3 for my design. Then click on the Above icon in the Position Each Copy section. Click Replicate. Left click and drag a box around the top outline elements. Right click and Group.

Now repeat the above steps for the lower part of the design. Don’t forget to group the bottom elements.

I always save my design before I send it to my Cameo, just in case. Once the design is saved, select the entire design. Right click and select Flip Horizontal. I always like to mirror my designs myself when using HTV instead of allowing the software to do it for me.

Before I cut my vinyl, I cut a piece of paper the size of my design and auditioned it on a shirt. I decided that four repeats of the outline was going to make the design too large so I ungrouped each outline element and deleted the outermost elements and then regrouped the design.
Click on the Send Tab. Change your Material to the type of HTV you are using. I used HTV Smooth because I was cutting Siser EasyWeed HTV. I use Cut by Fill Color because I can select which part of the design I am going to cut. I just uncheck the part I do not want to cut and then proceed.
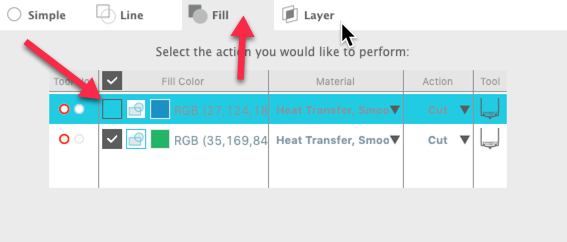
Position your first piece of HTV on your mat, shiny side down. Perform a test cut. A good test cut for HTV is when the vinyl is easy to remove and the carrier sheet is not cut. Once you have the correct settings, cut the first part of your design. Repeat for the second part of your design.
After my design was cut and weeded, I pressed it onto a shirt. I positioned the outlines first, since they were the largest part of the design. Because my shirt had raglan sleeves, I used a press pillow so the seams would not interfere with the pressure when I pressed. If you don’t have press pillows, check out this blog post to see how to make your own.
I pressed it at 305 degrees for about 3 seconds, just enough to activate the glue so the transfer sheet could be removed. Then I positioned the solid word. I made sure the entire design was covered and pressed for 15 seconds. Here’s the finished shirt.

I think the shirt will be a hit at the next soccer game! If you use this technique, be sure to join my FB group, Libby’s Craft and Sewing Group, or Libby’s Silhouette Group and post pictures!!
Until next time,
Happy Crafting!
Disclaimer: Posts on this site may contain affiliate links. Clicking on one of these links or making purchases at linked sites does not mean you pay more for your purchases. It means I may receive a small commission on your purchase. This commission helps defray the costs of this site and enables me to continue to provide you with new and exciting content.
How do I get it to weed properly or cut properly. it all pulls off the backing after I cut it. did I do something wrong in the instructions with the knife tool?
Deb, what kind of vinyl are you using? You might try adding weeding boxes around the words so that you are not dealing with such large pieces of vinyl. The other thing that might help is making sure your letters are not too close together. Let me know if you need more help!
Libby,
Great instructions in this tutorial but I have done something wrong and can’t get it correct. After you do the internal offset, your letters are not filled, but mine are. And when I cut them, I can’t get the edges to just cut . I used the Impact font also. What have I done wrong
Sandy, thanks! Just wondering if you selected both the letters and the offset and make them a compound path? That takes the color away but also binds the two elements (the letters and the offset) into one design element and should allow the design to cut properly. If this does not work, let me know!
Libby, This is the part I was doing wrong. I didn’t select both letters. After reading the instructions again, everything worked great. Thank you for your reply
Awesome! Glad it worked!!
Thank you!!!!!
<3!
I’m a visual learner. Is there a video?
Debra, I have not done a video but will put it on my list of things to do! Thanks for the suggestion!! In the meantime, if you have questions, please let me know.
Great tutorial! Thank you for sharing!