I just love being able to create my own paper and printable vinyl using digital papers! And now, Sparkleberry Ink has released some of their holiday vinyl patterns as digital papers!

Each of the pattern groups shown above are available individually or as a bundle.
You have to have Silhouette Studio Designer Edition or above to import custom patterns. There are lots of other great reasons to upgrade to at least Designer Edition of the software. You can check out the differences between the software levels on the Silhouette America website.
So once you have purchased the digital patterns and downloaded them, how do you get them into your Silhouette Studio? If necessary, unzip the files you downloaded.
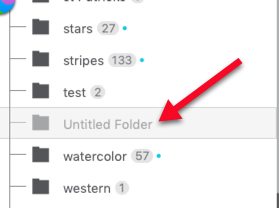
I have a lot of digital patterns in my Silhouette Studio so I have added category folders to my main pattern folder. To do this, click on the Library tab. Now right click on “Pattern” in your library and select New Folder. Scroll down (if necessary) and locate “Untitled Folder”. Name the folder.
Locate the newly downloaded digital patterns on your computer. Open the first folder. Since I have the Ultimate Bundle 3 from Sparkleberry, my first folder is Beary Christmas Navy. Left click on the first jpg file. Hold the shift and click on the last of the jpg files. All three of the image files should be selected. Now you can either drag them into the Sparkleberry folder or, if the Sparkleberry folder is selected, drag them into the preview window.
Now that your patterns are installed, it’s time to play!
Let’s go back to the Design tab in the software. Since I am going to create gift tags using printable sticker paper, I changed my page size to 8.5×11. I also pressed “M” to turn on the registration marks that will be used when I am ready to cut the stickers. Remember to make sure nothing is outside the red box or inside the hash marked area.

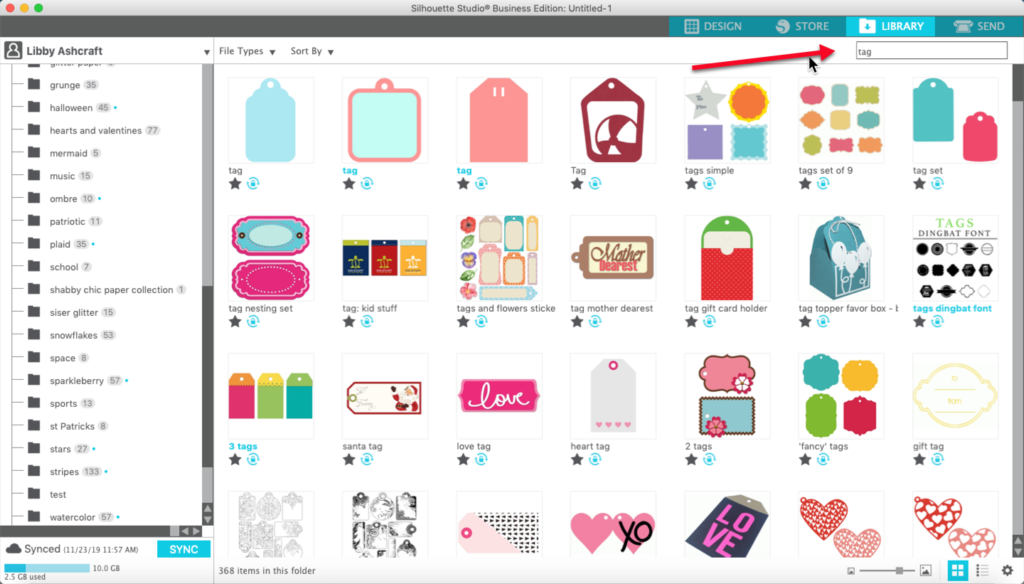
I have purchased a number of tag shapes from the Silhouette Design store. In my Library, I entered “tag” in the search box and pressed enter. I was then able to see all the tags I have purchased. Now I can select the ones I want to use.

First I selected a group of tags (Design #23494). They came in as a group so I right clicked and selected Ungroup. Now I can select each of the tags and fill them with a digital pattern. Select one of the tags. To access the patterns, click on the Fill Color icon in the right toolbar. Click on the third tab (Patterns) and scroll down to your Sparkleberry folder.

When you hover over one of the pattern tiles, the name of the pattern should show, so it is easy to figure out which of the patterns you want to use. Locate the pattern you want to use and click to apply the pattern to your tag.

Once you have applied the pattern to the tags, you can modify the way the patterns look by clicking on the Advanced Options in the Fill Pattern panel. I selected the round tag and adjusted the angle of the pattern.


Then I selected the bell shape. In the Advanced Options, I adjusted the Scale of the pattern.

Here are a few more of the gift tags I have ready to print later today. Hope you have fun using digital patterns to create your own unique gift tags!

If you enjoyed these tips, please join my Facebook groups … Libby’s Silhouette Group — Tips, Tricks, Tutorials and Projects, Libby’s Craft and Sewing Group and Running With Sisers – Juliet and Romeo. You can also find me on FB at Libby’s Loft.com. Please join and feel free to ask questions and share your creations! I look forward to seeing you there!!
Until Next Time,
Happy Crafting!!
Disclaimer: Posts on this site may contain affiliate links. Clicking on one of these links or making purchases at linked sites does not mean you pay more for your purchases. It means I may receive a small commission on your purchase. This commission helps defray the costs of this site and enables me to continue to provide you with new and exciting content.
Until next time,
Happy Crafting!!
Disclaimer: Posts on this site may contain affiliate links. Clicking on one of these links or making purchases at linked sites does not mean you pay more for your purchases. It means I may receive a small commission on your purchase. This commission helps defray the costs of this site and enables me to continue to provide you with new and exciting content.

