The ability to create puzzles is one of the fun new features of Silhouette Studio v4.2. Use it to create cute puzzles using cardstock, paper, and printable magnet paper! It is available for users who have Designer Edition Plus or Business Edition.
Puzzle creator works with any file you can print, including your own pictures, clipart or other single layer printable images. You can also use print and cut images but must remove the cut lines in order for the puzzle creator to work.

To get started, create a new workspace in your Studio software. In the Page Setup panel, set the size and orientation for your puzzle. I used 8.5″ x 11″ paper, set in a landscape orientation for the flower puzzle shown above.

Because I already have a workspace open, I use File–Merge to bring my picture into the workspace. Remember that using Merge brings the file into the current workspace, while using Open creates a new workspace. Once the file is in your workspace, you may need to resize it. You can do this either by clicking and dragging handles on the bounding box or using the Scale tab in the Transform panel.

In the Scale window, make sure that the padlock is closed so that your picture will remain in proportion when you are sizing it. Always work with the larger of the dimensions to make sure that your newly sized design will fit the workspace. I changed my width to 8″ for this example.
Since this will be a Print and Cut, press the M key on the keyboard to turn on your registration marks for your print and cut. You want to be sure your picture will fit inside the registration marks.

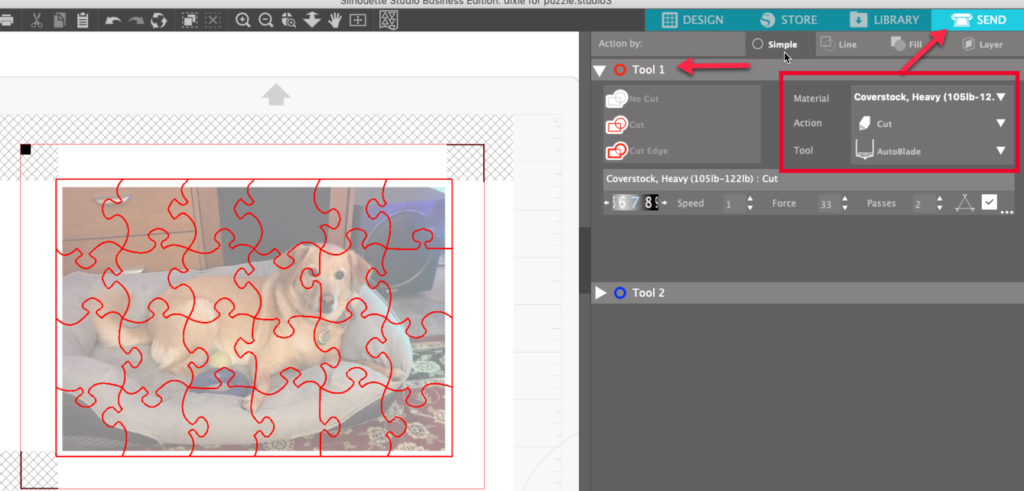
Now the fun begins!! Click on the Puzzle Panel. If your picture is selected, the choice will be Puzzle Selected Shape. If nothing is selected, the choice will be Select Puzzle Area. In this case, move your cursor into the workspace and left click and drag a box around the picture. The initial puzzle lines will be added on top of your picture. (I increased the transparency of my image so the puzzle lines are more visible.)

Let’s take a look at the Puzzle panel tools. In the Puzzle Layout area, you can increase or decrease the number of rows and columns for your puzzle pieces. The maximum number of rows and columns is 25 each.

In the Puzzle Settings area, you can change the way the puzzle pieces will look. Unchecking Curvature results in straight lines instead of curved ones.

With Curvature selected, you can control the amount of curve in the puzzle shapes and also the location of the joining parts of the puzzle.

- Adjust the amount of curve of the lines (0-100%)
- Adjust the amount of ripple (0-100%)
- Adjust the amount of wobble (0-100%)
- Click Randomize until you like the layout of the puzzle pieces
The amount of curve and ripple change the shape of the puzzle pieces. Adjusting wobble adjusts the part of the puzzle piece that connects into the adjacent puzzle piece.

If you increased your image transparency so you could see the puzzle lines, be sure to set it back to 0 before you print!!

Select Print from the File menu and print the image. Print the puzzle – the puzzle lines will not print unless you have applied a weight to them.
Once your page has printed, load it on the mat, making sure your orientation is the same as the print orientation. Click on the Send tab and select the correct tool and material to be cut. If necessary, adjust your blade depth. Once you have the correct settings, perform a test cut. If the settings are correct and your test cuts cleanly, cut your puzzle.


Create an Oval Puzzle
Let’s take puzzle making to the next level and create an oval puzzle.

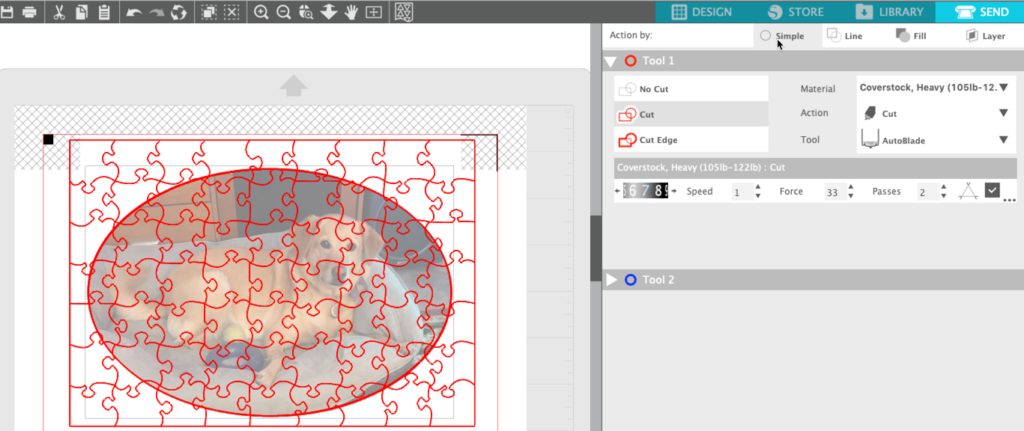
Open your image. Select the Oval tool and left click and drag an oval over the puzzle. I increased the transparency of the oval so I could see thru it and make sure I was not cutting off part of the image I wanted to keep.
Select the Oval tool and left click and drag an oval over the puzzle. I increased the transparency of the oval so I could see thru it and make sure I was not cutting off part of the image I wanted to keep.

With the image and the oval selected, click on the Modify Panel in the right toolbar. Select Crop.


Click on the Puzzle Panel icon. With nothing selected, click on Select Puzzle Area. Move your cursor into the workspace. Left click and drag a box around the shape. The puzzle pieces will be applied to your image. NOTE: I found that if I had the shape selected and used Puzzle Selected Shape that the software reversed my crop and I was presented with a rectangular image again.

After adjusting the rows, columns and other settings for your puzzle pieces, you need to create a cut line around the oval. The puzzle creator creates a rectangular outline around objects by default, no matter the shape of the image.
Click on the Offset Panel. Select Offset. Use the slider to adjust the distance to 0.00 so that the offset will be right on the edge of the image. Click Apply.

Print your puzzle page, making sure to check your orientation. Remember to decrease your transparency, if needed.
Once your puzzle page is printed, load it on your mat, making sure to check your orientation. Click on the Send tab and select the tool/blade and material for your job. You can cut this puzzle just the way it is. There will be extra cut lines, outside your image, but they will not negatively impact your puzzle.

If you do not want to have all those extra cut lines, or you want to edit the puzzle pieces, you can do this before printing your image.
Click on the puzzle pieces to select them and right click. Select Release Compound Path. This will make each puzzle piece a separate item.

Click anywhere outside the image to deselect all the objects. Now you can click on individual lines and delete them. You can also edit the points of individual lines, if desired. I checked the edges of my oval, looking for very small pieces like the one below.

Double click on the line to activate the edit points. You can hold down the Shift key and drag across a group of lines to select more than one point at a time. Press the Delete key on the keyboard to get rid of these lines and that pesky small piece. You can also delete the rectangle around the entire design area as you do not need it. Here’s what my design looks like with all the extra lines removed.

Print your puzzle. Once it is printed, load the printed page on your mat, making sure you check your page orientation. Adjust your settings, if necessary and perform your test cut. Cut your puzzle and enjoy!

I created some of my puzzles using Reflections cardstock from Michaels. I also cut some using Printable Magnet Sheets by Silhouette.

I really like this new puzzle creator and can see lots of fun uses for it — small gifts for classmates, “quiet” toys for toddlers, and of course, refrigerator decorations! Create magnet puzzles and a cookie sheet to keep the kiddos busy in the car on road trips! Please share your puzzle projects with us in my Facebook Groups , Libby’s Silhouette Group and Libby’s Craft and Sewing Group.
Until next time,
Happy Crafting!!
Awesome… so excited to begin creating puzzles!
Okay…so I saw where you said max rows/columns is 25×25. Do you know how to have it make a puzzle larger than the “cut” window? Like if I wanted a 20×25 but size wise wanted it 24″×18″…how I would potentially get that accomplished?
Michelle, In the Page setup Panel, change the Machine to NONE, the Mat to NONE and the Media size to Custom. Uncheck Constrain Media to Cutting Mat. Then enter the size you want to create the design. I was able to create a design with these settings on my Mac, using v4.4. Let me know how this works for you.
What is the constrain media to cutting mat for ?
When you select constrain to cutting mat, it will not allow you to set your media larger than the selected mat area. You can make it smaller, but not larger.
What thickness of cardstock did you use for puzzle on silhouette? I brought chipboard for mines and it is very think and I had to use sticker paper to put on top of it. Look like you just printed yours and cut it which will be way easier for me.
I used 65lb cardstock for mine. I would try 110lb as well if you want it a little thicker.