Do you ever have trouble selecting multiple objects in a design? I sometimes did until I discovered the Select by Color tool.
I like to add color to objects when I am designing. This makes it easier to select the object by just clicking on it. If the object is not filled with color, you need to click directly on the object to select it. If it is filled with color, you can select it by clicking anywhere in the colored part of the design.
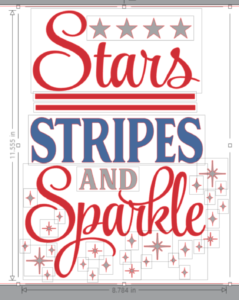
So you can see why I like adding color to design elements. Often when designing, I need to select elements that are spaced out thru the design as in the design below.

I want to select all the grey items so I can change the line color. I could select one of the items and then hold down the shift key and select each item, but this would be tedious. Instead I like to use Select by Color. This great tool is available in all levels of Silhouette Studio.

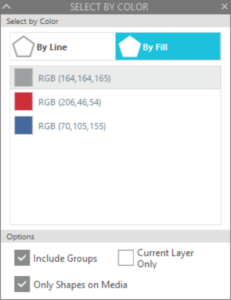
When you click on the icon for Select by Color, the Select By Color panel opens.

You can choose to select by Line Color or by Fill Color. You can also control whether designs outside the mat area will be selected and whether items in groups or layers will be selected. Using these options allows you to fine-tune your selections.
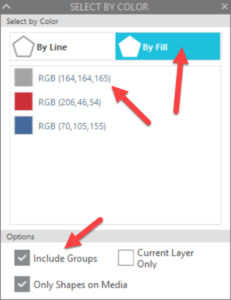
In the design above, I want to change the line color of all the stars to grey so I can use this design for sublimation, so I will choose Select by Fill.

The stars at the top of the design are grouped so I want to be sure to check “Include Groups”. When I click on the grey color block, all the items filled with grey are selected.

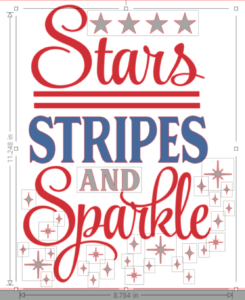
I also want to change the line color for the word “Stripes” to grey. To do this, I can hold down the Shift key and click on the blue color chip in the Select by Color window. Now everything but the red is selected and I can quickly change the line color to grey.

I love tools that make my designing easier and I think you will agree that Select by Color is one of those tools! Let me know what you think!
If you enjoyed these tips, please join my Facebook groups … Libby’s Silhouette Group — Tips, Tricks, Tutorials and Projects, Libby’s Craft and Sewing Group and Running With Sisers – Juliet and Romeo. You can also find me on FB at Libby’s Loft.com. Please join and feel free to ask questions and share your creations! I look forward to seeing you there!!
Until Next Time,
Happy Crafting!!
Disclaimer: Posts on this site may contain affiliate links. Clicking on one of these links or making purchases at linked sites does not mean you pay more for your purchases. It means I may receive a small commission on your purchase. This commission helps defray the costs of this site and enables me to continue to provide you with new and exciting content.
Until next time,
Happy Crafting!!