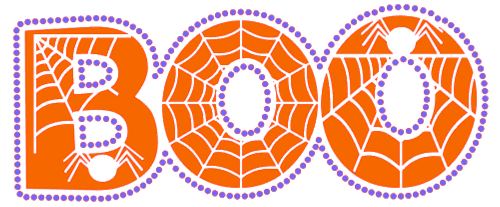
Looking for just the right shirt for Halloween?? How about this cutie that has glitter HTV, rhinestones and spiders!! You can create it quickly and easily … keep reading to learn how to create it yourself!
You can do this in most of the softwares available for your electronic cutter. I will be working in Silhouette Studio but you can also do this in Scan ‘n Cut Canvas or Canvas Workspace. To get started, open a new document.
Click on the Text tool in the left toolbar. Bring your cursor into the workspace and left click to get the blinking cursor. Type the word “BOO”. Click off the word to exit the text entry mode. Now click back on your text to select it
I changed my font to LW Jumbo, a font from Lori Whitlock. You can find it in the Silhouette Design Store. You can use another font, you just want to choose one that is “chunky” so you have lots of room for your spider webs and spiders. You can access your different fonts in the Font Panel in the right toolbar or in the font dropdown menu in the Quick Access Toolbar.
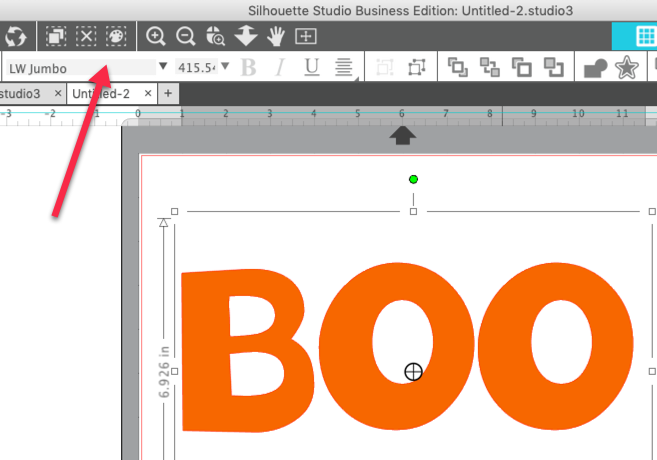
I just used a corner handle to left click and drag to increase the size of the lettering until it was about 9.5-10″ wide. This should be large enough for most shirt sizes.
At this point, I always make a duplicate copy of the text and drag it off the mat. This way, if I make a huge mess in the design process, I can always start over. This also gives me a copy of the text so I know which font was used. Once I complete the next step, I cannot edit the lettering as “text”.
With the text selected, I right clicked and selected Convert to Path. The word is no longer “text” that can be edited. It is now design elements that look like text. I also Ungrouped the letters for ease of use later in the design process.
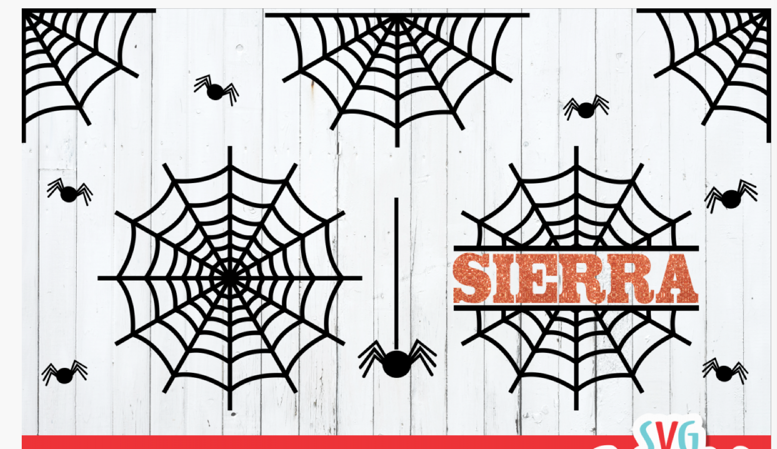
I purchased a set of spider webs from Design Bundles.com. This design set includes the SVG files that already have cut lines, so that meant no tracing for me! I liked this design set because it gave me several styles of spider webs and also some spiders.
Once the files were downloaded and unzipped, I was ready to create. I selected Merge from the file menu so that my spider web would be come into the open workspace and join my word on the screen.

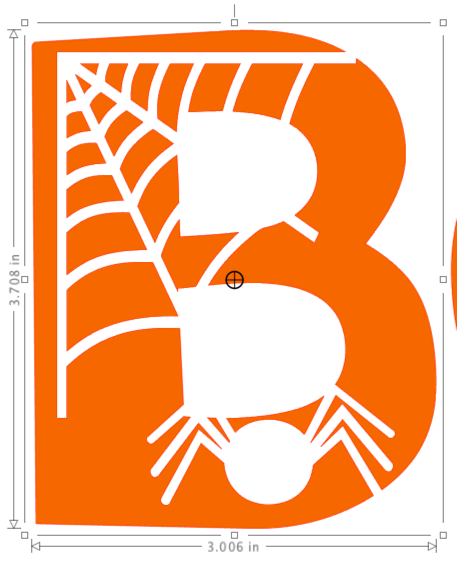
With the web in the workspace, I moved it into position over the letter “B”. Then I used the corner scale handle to adjust the size so it fit on my letter.
I used the Merge command again to bring the spider into the workspace. I positioned the spider over the letter “B” and adjusted the size. I wanted to be sure most of the spider was over the letter.

The spider design has a straight piece of web grouped with the spider. I did not need that straight piece, so I ungrouped the design and deleted it.
With the spider selected, I right clicked and selected Duplicate. I will need him again in a few minutes so I just moved him out of the workspace for now.
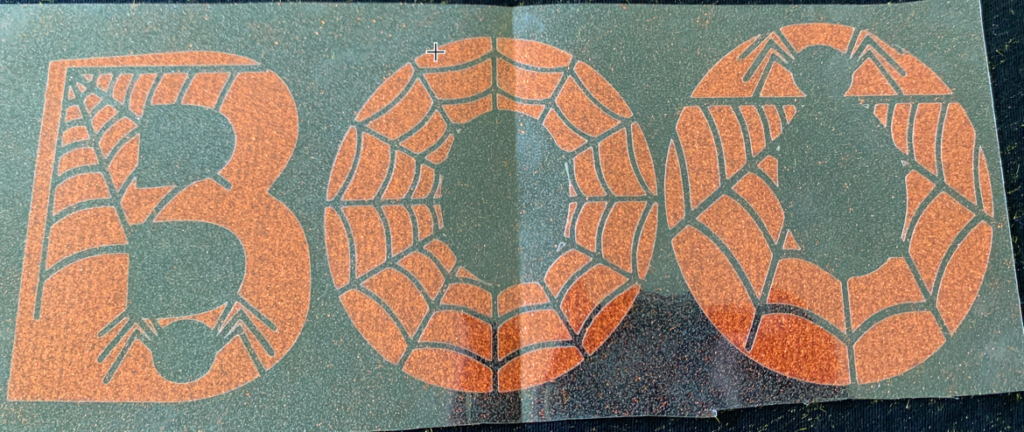
I left click and dragged a box around the letter “B”, the web and the spider. I selected Subtract from the Modify panel to subtract the spider and the web from the letter.
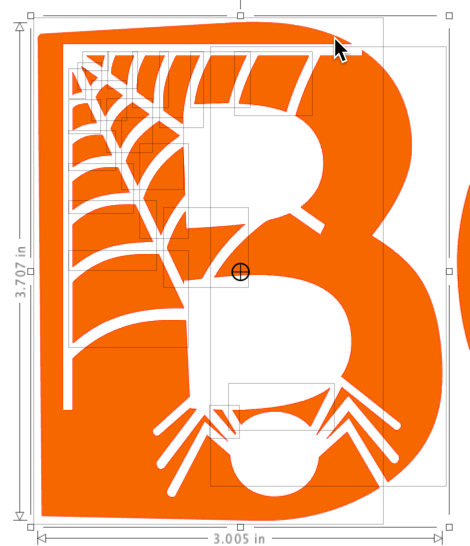
Before I did anything else, and with the result of the subtraction still selected, I right clicked and selected Make Compound Path from the menu. This will bond those individual elements together and they will function as one design element.
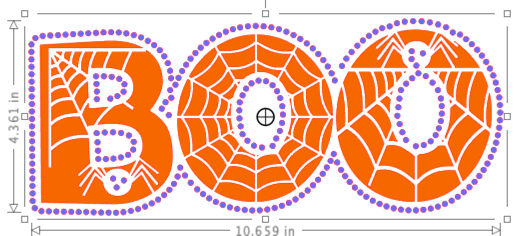
I repeated the steps above for the first “O”. I used the Merge command from the File menu and selected the Full web. I resized it and positioned it over the letter. Once I had it where I wanted it to be, I selected the letter “O” and the web and clicked on Subtract in the Modify panel. This time, with the result of the Subtract command still selected, I used the keyboard shortcut CTRL-E (CMD-E) to create a compound path.

For the last letter, I used the web called Half Web. I adjusted in over the last letter “O”. I brought the extra spider into the workspace and positioned him on top of the web. Once again, I selected the web, the spider and the letter then selected Subtract from the Modify panel. I used that keyboard shortcut CTRL-E (CMD-E) to create the compound path.

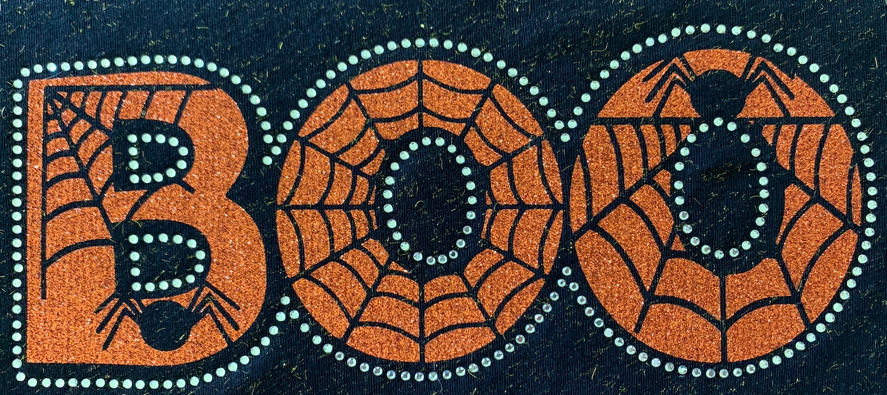
I could have used the design just like this, but it’s no secret, I like bling so I decided to add some rhinestones.
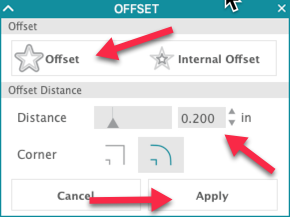
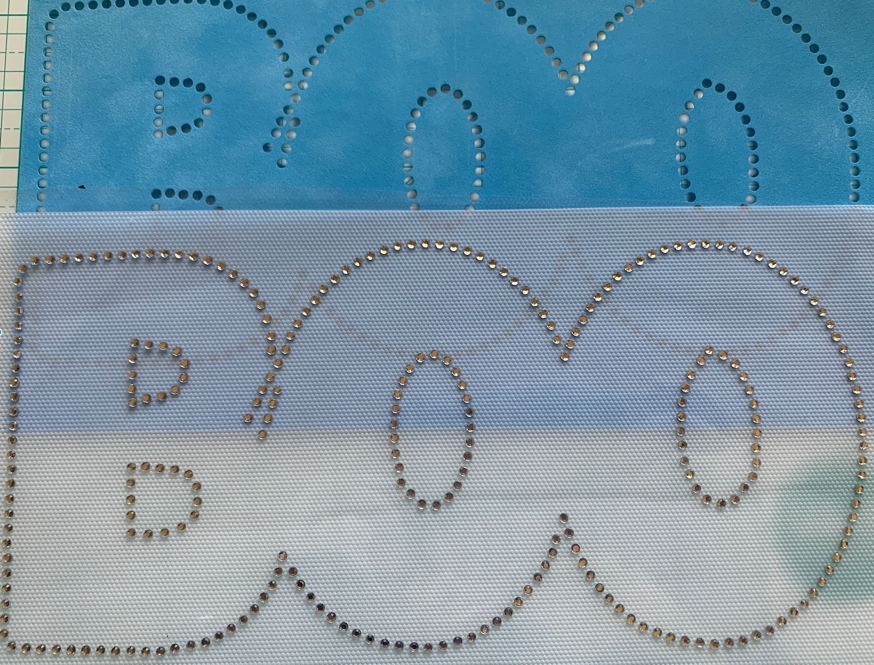
I selected all three of the letters and used CTRL-G (CMD-G) to group the letters together. With the letter group selected, I clicked on the Offset panel icon in the right toolbar. I selected Offset. I changed the distance to 0.200 and clicked Apply.
With the offset selected, I clicked on the Rhinestone Panel icon. I changed the Rhinestone effect to Edge. Rhinestones replaced the offset line. (I added color to my stones to make them easier to see.)
I don’t like the placement of some of the rhinestones. To fix this, I clicked on Release Rhinestones. This detaches the stones from the path used to create them and ungroups them, allowing me to manipulate them individually.
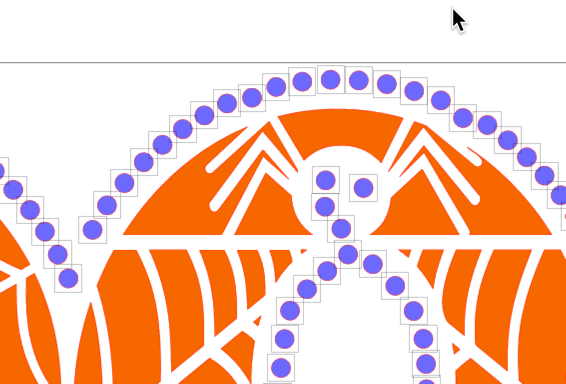
I clicked off the entire design so nothing was selected and then began to adjust the placement of individual stones. I clicked on those placed in side the spiders and used the Delete key on the keyboard to delete them. You can select more than one stone at a time by holding the SHIFT key down when you left click on the stones. You can also left click and drag a box around a group of stones to delete them.
I selected and moved stones to get better spacing. Where necessary, I selected an individual stone and selected Duplicate to add extra stones. If you are going to add stones, make sure you do not get them so close they are touching. There needs to be space between them so that when you cut your flock each hole is cut separately, not merged with the one next to it. After I finished making my adjustments, I selected all the stones and grouped them together.
I saved the design and then moved on to the cutting. I like to use Cut by Fill Color when working with multi-color designs. In this window, I set the material type for each thing I will be cutting. I can uncheck things I don’t want to cut and only check those I do want to cut and don’t have to move things all around on my screen.
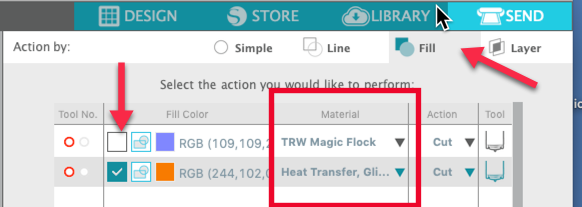
If you are making this design, remember to Mirror the HTV part of the design. Since I set my material type to Heat Transfer, Glitter, my software asked me if I wanted to mirror the image. If you choose this option, remember that the software not only mirrors the design, it moves it to the other side of the mat … so be sure you have your vinyl in the right place!!
One tip for weeding your glitter HTV — I always weed at an angle instead of straight across or down. In this case, weeding at an angle was especially helpful as I weeded out the web.
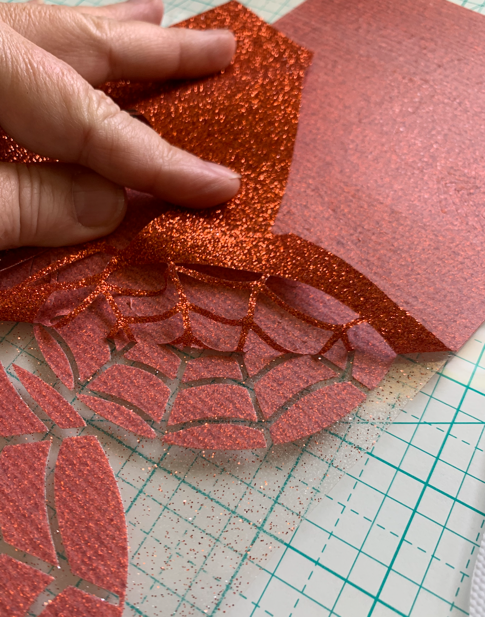
After the flock was cut and weeded, I added the stones. Remember to use a gentle circular motion as you brush the stones into your flock. When you place your transfer tape over the stones, do it “with authority” — don’t hesitate or you will have a mess!!
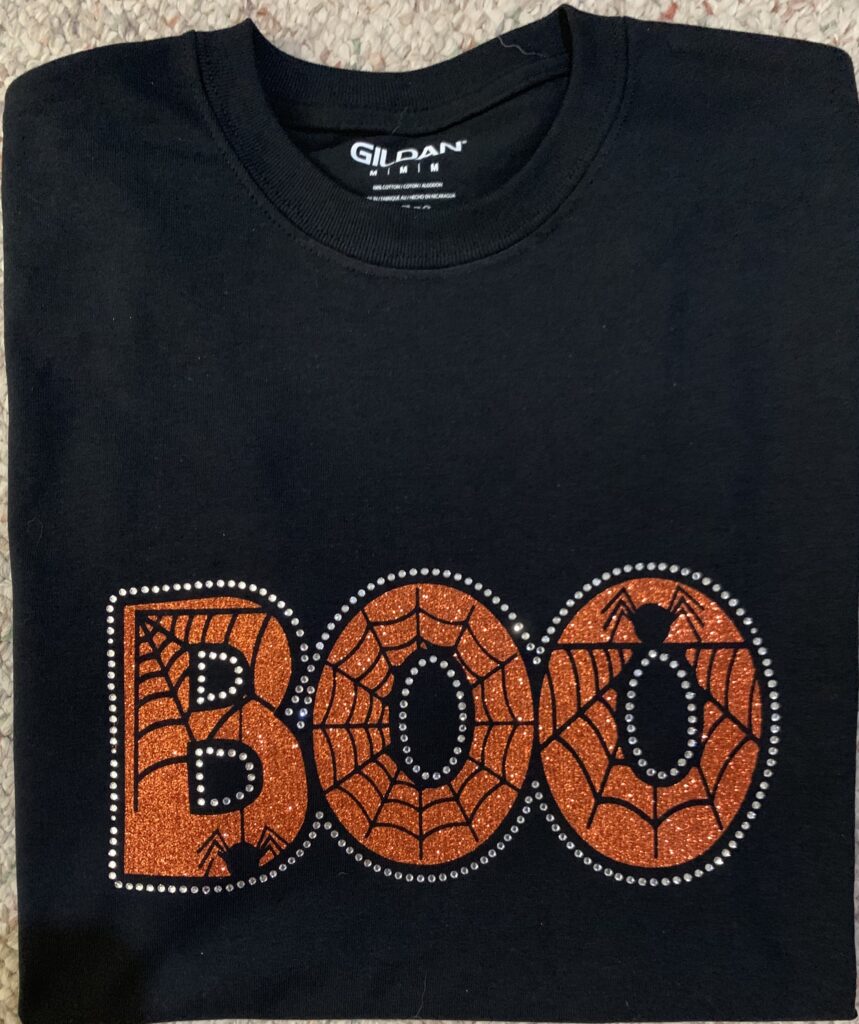
When working with HTV and rhinestones, always press the HTV on your garment first. I lined the HTV up along a center line. Notice I folded the HTV to get a center line for the design. It presses right out, so no worries. Press for about 5 seconds at the temperature recommended by the manufacturer. I was using Siser Glitter HTV, so my temperature was set to 320 degrees.
After the HTV was pressed, I removed the transfer sheet and lined up the rhinestones. I made sure all the glitter was covered by transfer tape before I pressed the stones. I then pressed the stones for 15 seconds. Here’s the final design, ready for Halloween (and cooler weather)!
I hope you have fun with this technique! Watch for more posts on creating your own custom holiday shirts!!
If you love this design but don’t have time to create it yourself, you can purchase it here on my website.
If you enjoyed these tips, please join my Facebook groups … Libby’s Silhouette Group — Tips, Tricks, Tutorials and Projects, Libby’s Craft and Sewing Group and Running With Sisers – Juliet and Romeo. You can also find me on FB at Libby’s Loft.com. Please join and feel free to ask questions and share your creations! I look forward to seeing you there!!
Until Next Time,
Happy Crafting!!
Disclaimer: Posts on this site may contain affiliate links. Clicking on one of these links or making purchases at linked sites does not mean you pay more for your purchases. It means I may receive a small commission on your purchase. This commission helps defray the costs of this site and enables me to continue to provide you with new and exciting content.
Until next time,
Happy Crafting!!
Disclaimer: Posts on this site may contain affiliate links. Clicking on one of these links or making purchases at linked sites does not mean you pay more for your purchases. It means I may receive a small commission on your purchase. This commission helps defray the costs of this site and enables me to continue to provide you with new and exciting content.
This is a great tutorial with easy to follow instructions and screenshots. Your process yields fabulous results.
Thanks!